
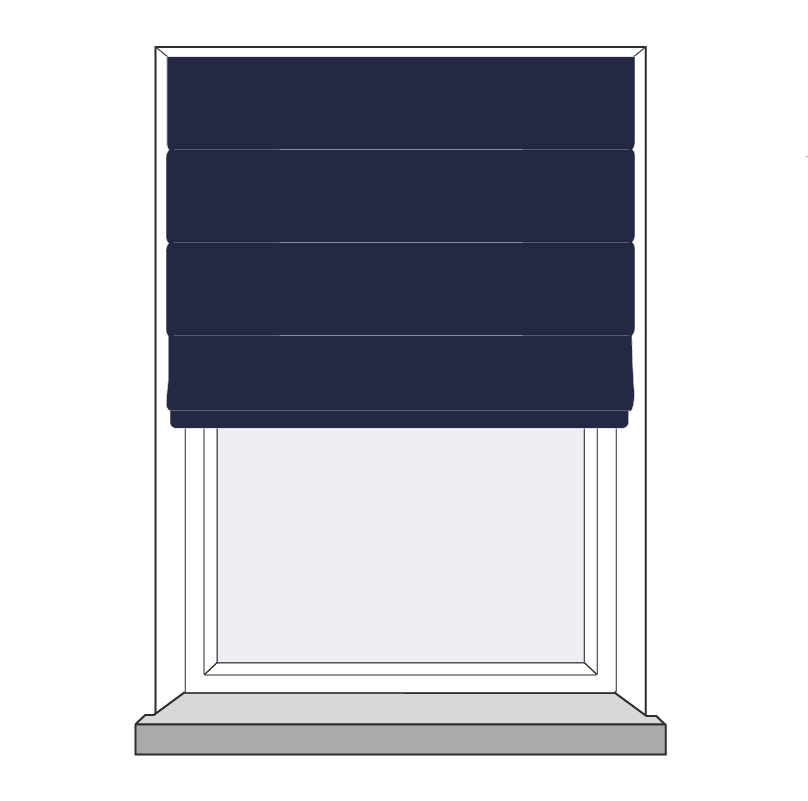
How to Fit Blinds & Curtains
Ready to install your new blinds or curtains? Our step-by-step fitting guides are here to make the process as easy as possible. From measuring to hanging, we provide clear, detailed instructions for every product. Whether you're a first-time DIYer or a seasoned pro, you’ll find all the tips, tools, and expert advice you need to achieve a perfect fit and transform your windows with ease.
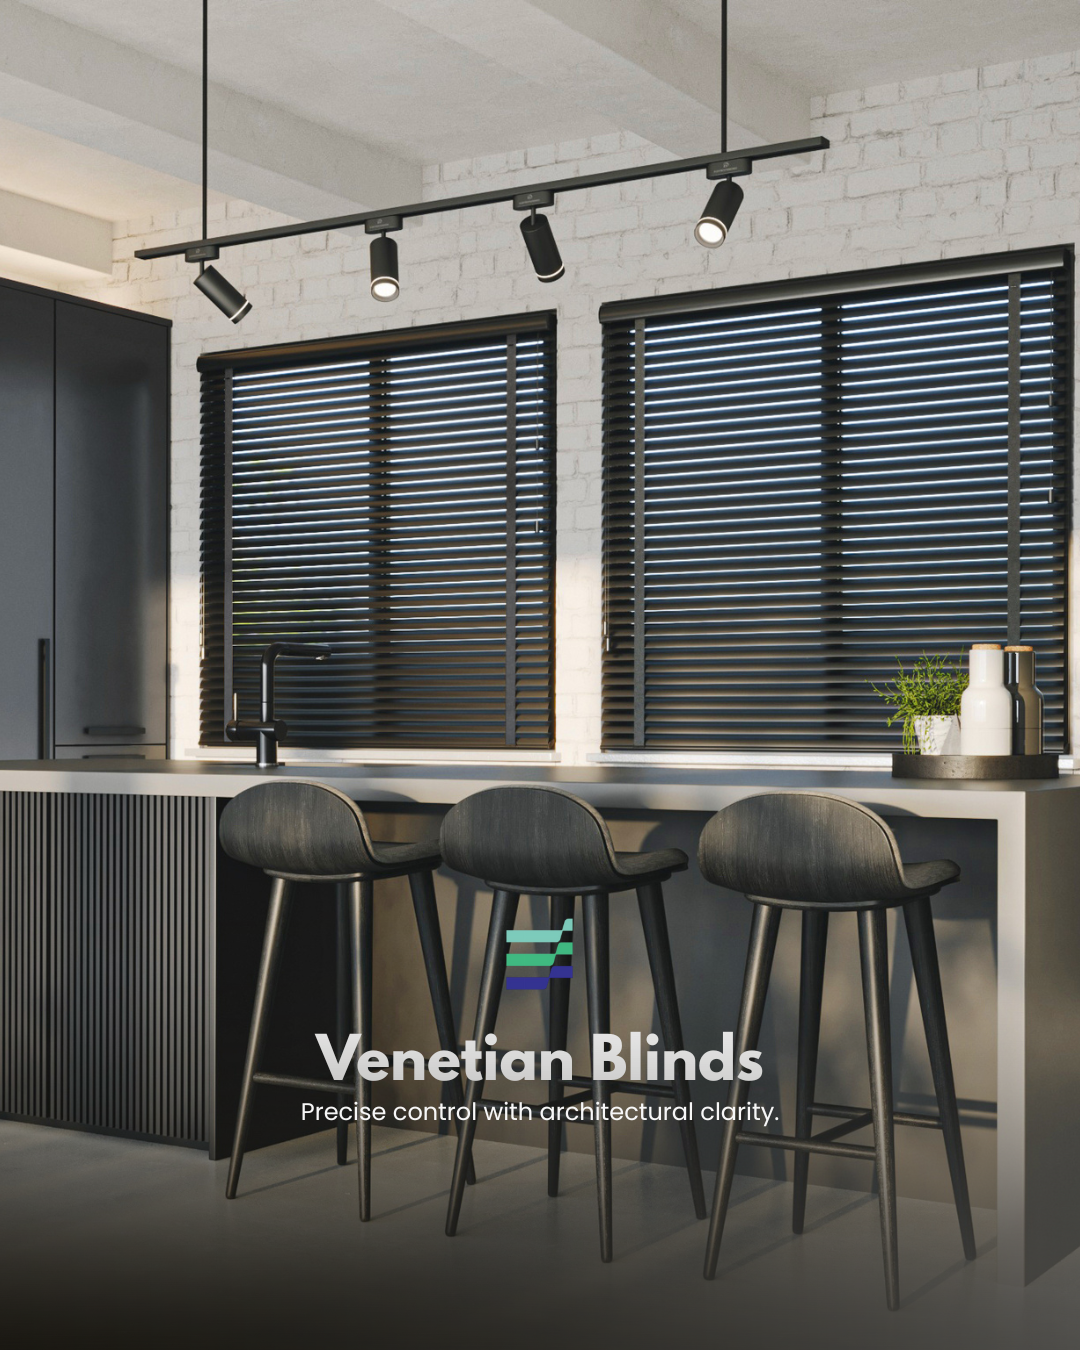
Blinds
Select from the list below:

What You'll Need
To install your new blinds you will need the below tools.
Note: You will need to provide your own screws, as the required type depends on the surface you're fixing to. Use 4mm diameter screws that are appropriate for the material you’re installing into.
Deciding where to mount the brackets
Ensure that brackets are positioned a suitable distance away from any window, door handles or any other obstructions to allow the blind to operate smoothly.
Fitting Instructions
Step 1
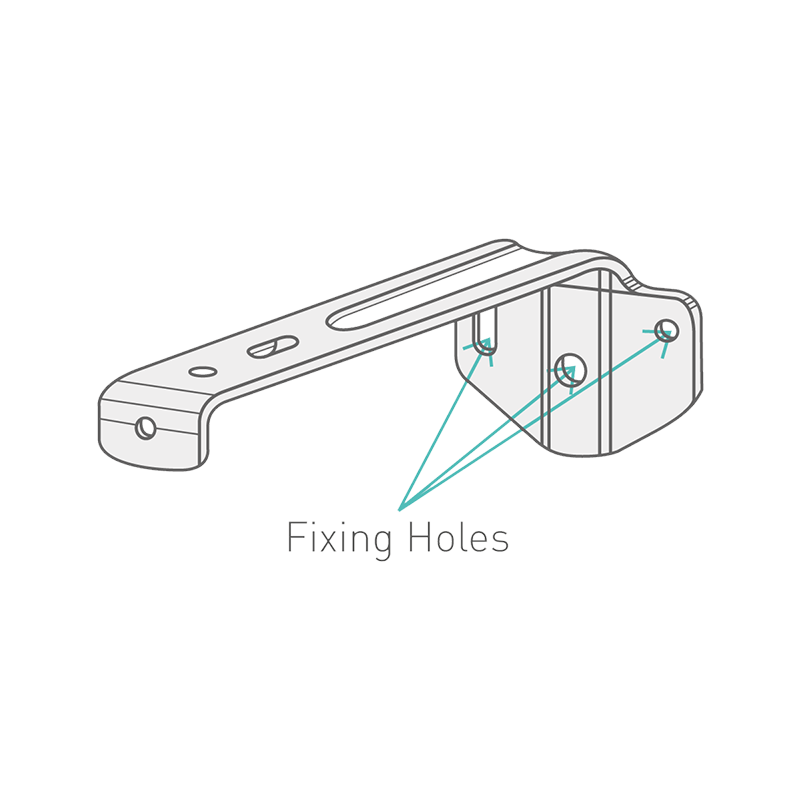
Bracket Positioning
Choose how to mount the brackets. The brackets are a universal type that can be used to top fix or face fix.
If you are looking to mount the blind onto the ceiling or underside of a recess you will need a top fixing.
For fixing onto a wall or window frame, use a face mounting.
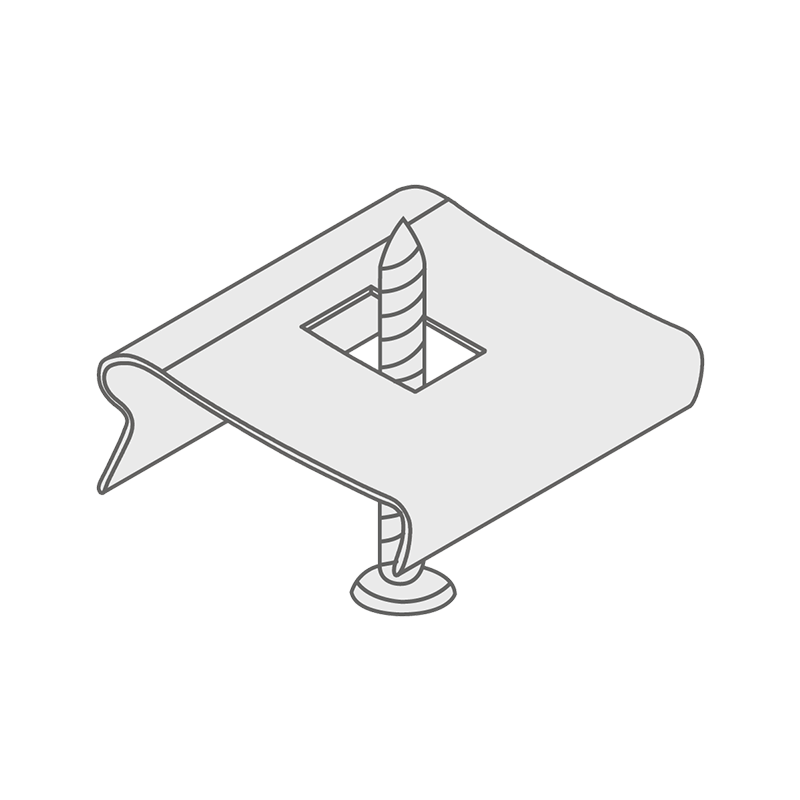
Mounting the Brackets
A bracket should sit either side of the rail, 110mm away from the end. Remaining brackets should be equally distributed along the width.
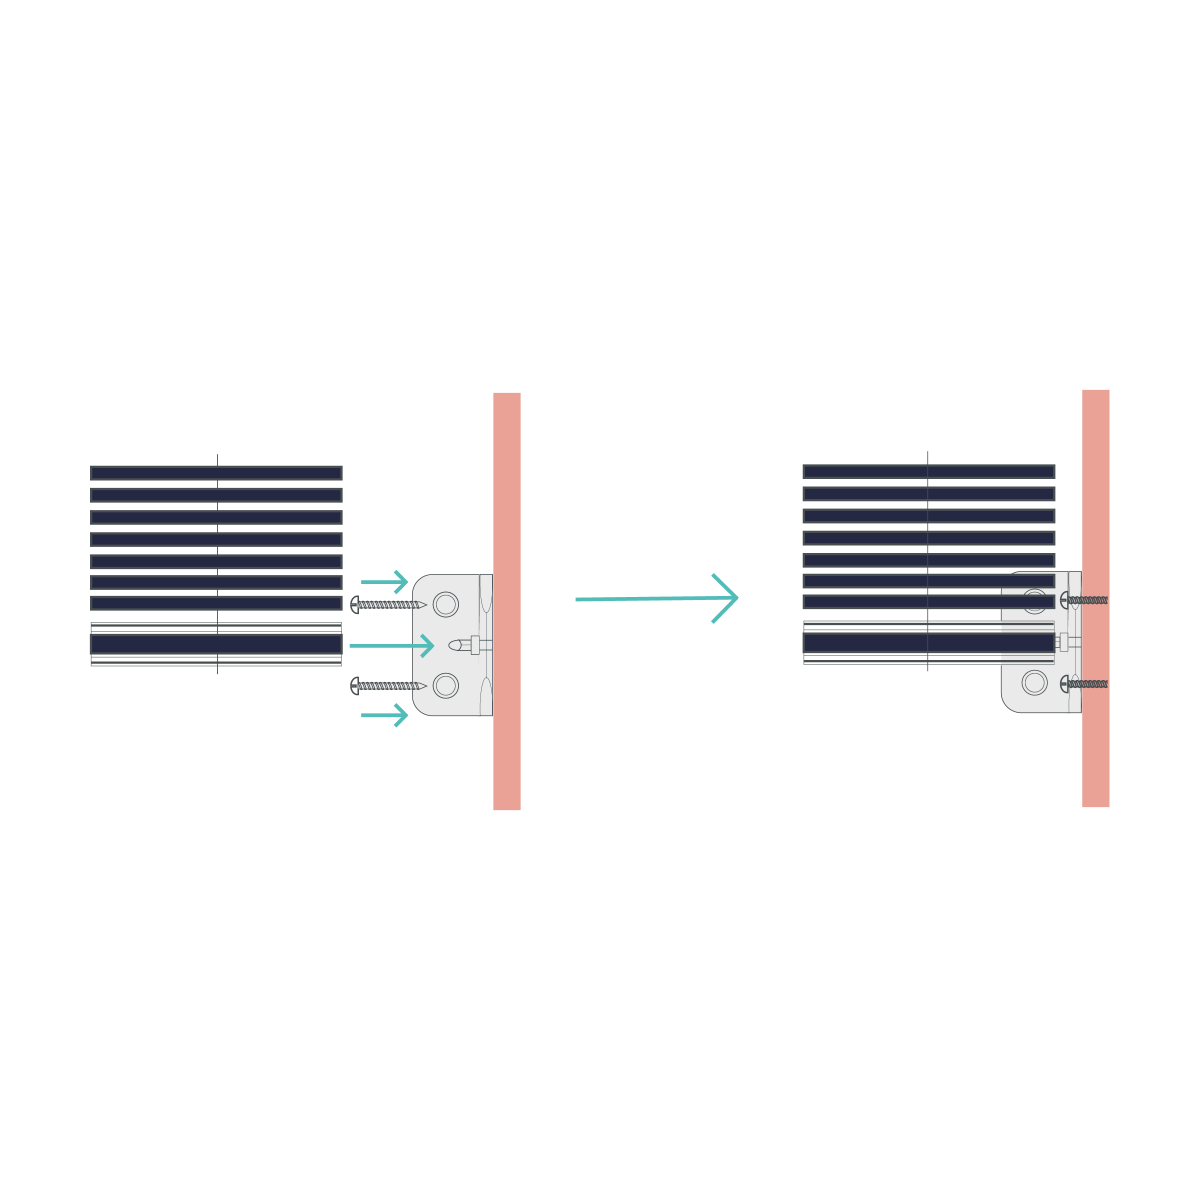
Hold each bracket into place and mark the hole positions using a pencil. Fit each bracket using 2 screws provided.
If a pilot hole is required, use a 2.5mm drill bit. Ensure the brackets are level to ensure the smooth operation of the blind. For fixing to alternative surfaces i.e. plaster or stroke concrete, alternative suitable fixings should be used.
Step 2
Fitting the Blind
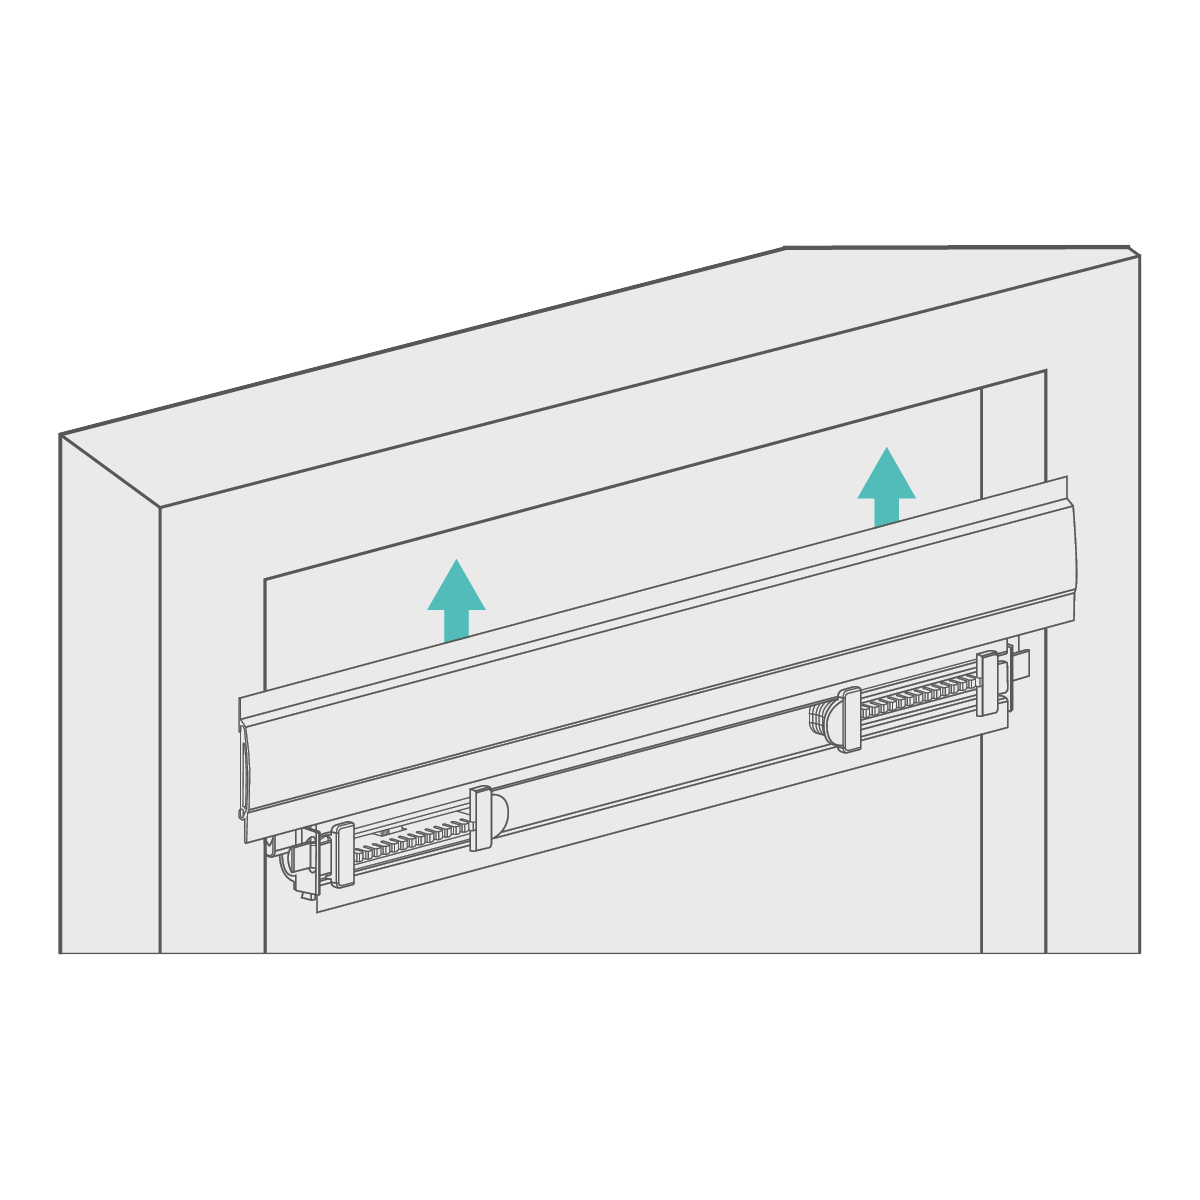
When the brackets have been fitted to the window area, holding the blind up, rest the front ridge of the rail onto the front lip of the bracket.
Lift the back of the rail to meet the bracket, push centre of the spring so that it clicks into place securely and release.
Step 3
Child Safety
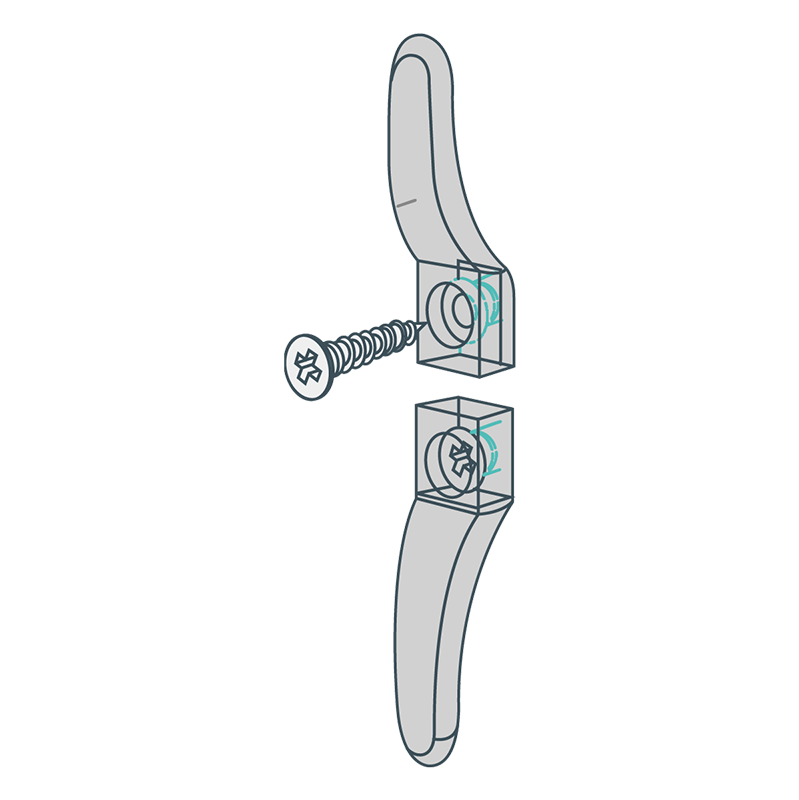
With the Idle pin end now in place. Insert the control end into the opposite bracket by depressing the pin end. Then, pull down vertically until the control end clicks into position.
Maintenance
Visual Checks
Your new blinds is maintenance free, however we recommend that regular visual checks are completed to ensure that no components have been damaged, which could result in operating difficulties and/or cause a safety risk.
If any maintenance is required please contact us right away.
Troubleshooting
Troubleshooting
If you pull the cord to open or close the blind but the blind doesn’t move, then take the blind down and look inside the headrail to make sure that the metal tilt rod is fully engaged with the sidewinder mechanism. This rod should rotate when the side chain is pulled. If it doesn’t, take off the headrail end cap located at the opposite end of the rail to the chain mechanism and push the metal rod until it’s fully engaged with the sidewinder mechanism. The chain should now rotate the rod.
Visual Checks
Your new blinds is maintenance free, however we recommend that regular visual checks are completed to ensure that no components have been damaged, which could result in operating difficulties and/or cause a safety risk.
If any maintenance is required please contact us right away.
- Don’t allow moisture to settle on the blinds.
- Wipe with a clean damp cloth.
- Vacuum your roman blind using the vacuum upholstery attachment.
- Don’t use any type of detergent to clean your blind.
- Don’t oil or lubricate any part of the blind to prevent damage.
- Dry cleaning recommended.
What You'll Need
To install your new blinds you will need the below tools.
Note: Screws aren’t supplied with the blind due to varying types depending on the material you’re fixing to. You will need to provide your own 4mm diameter screws that are suitable for the surface you’re installing into. Make sure the screws are the right length to securely hold the fixture in place.
Deciding where to mount the brackets
Ensure that brackets are positioned a suitable distance away from any window, door handles or any other obstructions to allow the blind to operate smoothly.
Fitting Instructions
Step 1
Bracket Positioning
If you’re fitting the blind inside the recess you can top fix the brackets to the lintel or face fix the brackets to the window frame.
If you’re fitting the blind outside the window recess ensure that measurement (C) in the diagram above is the same to ensure even window coverage.
Step 2

Bracket Fixing
The brackets are universal, and can be used to face fix to the wall or window, or top fix into the top of the window recess.
You will need to ensure that if you are top fixing the blind, you will need to install the brackets far enough away from the window to avoid the window handles.
Brackets can't be installed within 10cm of the ends of the blind due to the raise and tilt mechanisms.
Once the brackets are installed, you will need to open the swivel arms of the brackets so they are facing you.
Step 3
Inserting the Headrail
Now the brackets are installed, take your blind and offer it up to the bracket, keeping the metal swivel arms open and poinitng towards you.
Step 4 - Optional
Hold down Clips
Hold down clips are optional. Using two small screws, screw the hold down clip to the window facing or the wall/window recess. Pop the bracket pin ends into the hole at bottom rail end.
Step 5 - Optional
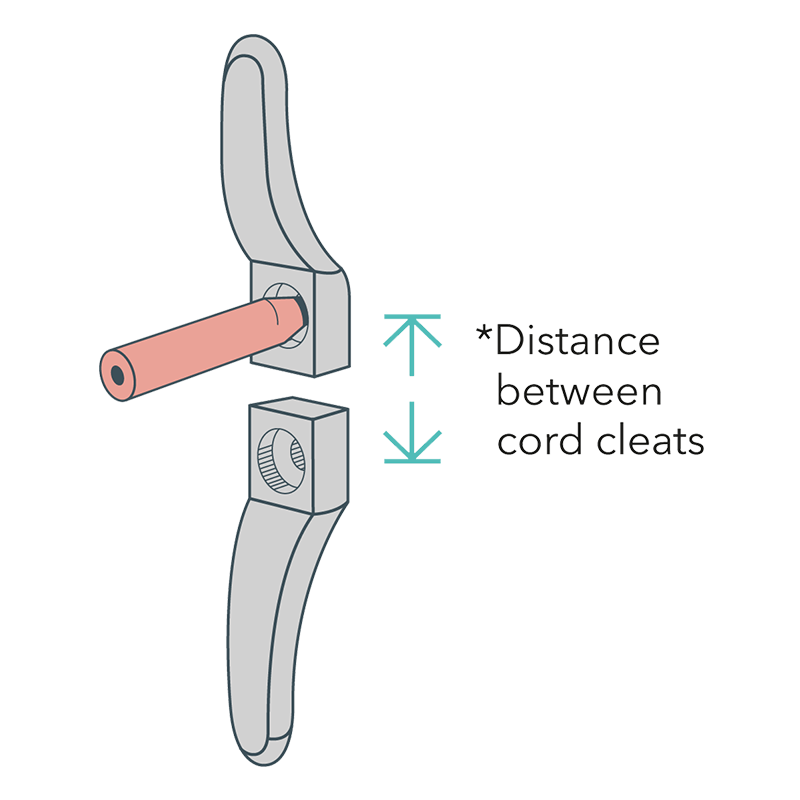
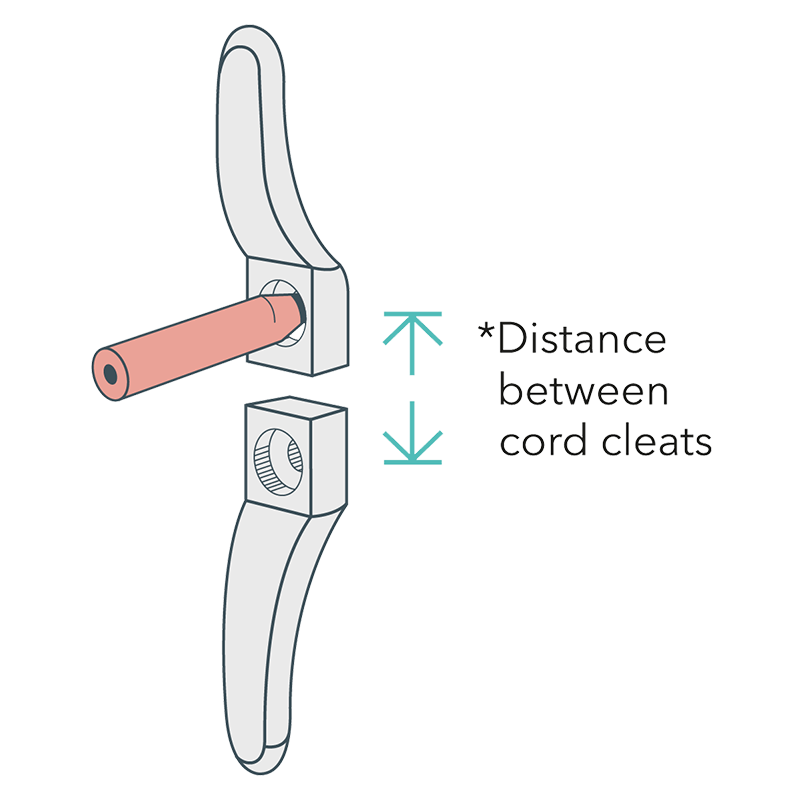
Safety Cleat
You must install the safety cleat as close to the headrail of the blind as possible and in all cases not less than 1500mm from the floor.
Place the safety cleat in the desired position on the wall and mark the positions of the holes with a pencil. Drill holes as required.
Step 6 - Optional
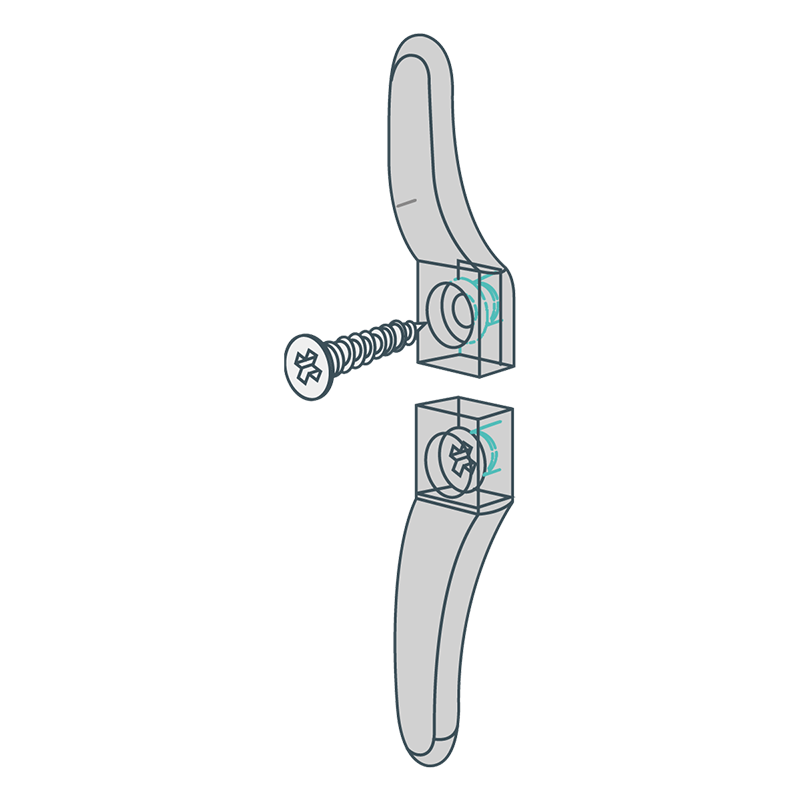
Use the screws provided to attach the safety cleat to the wall in the pre-drilled holes.
Step 7
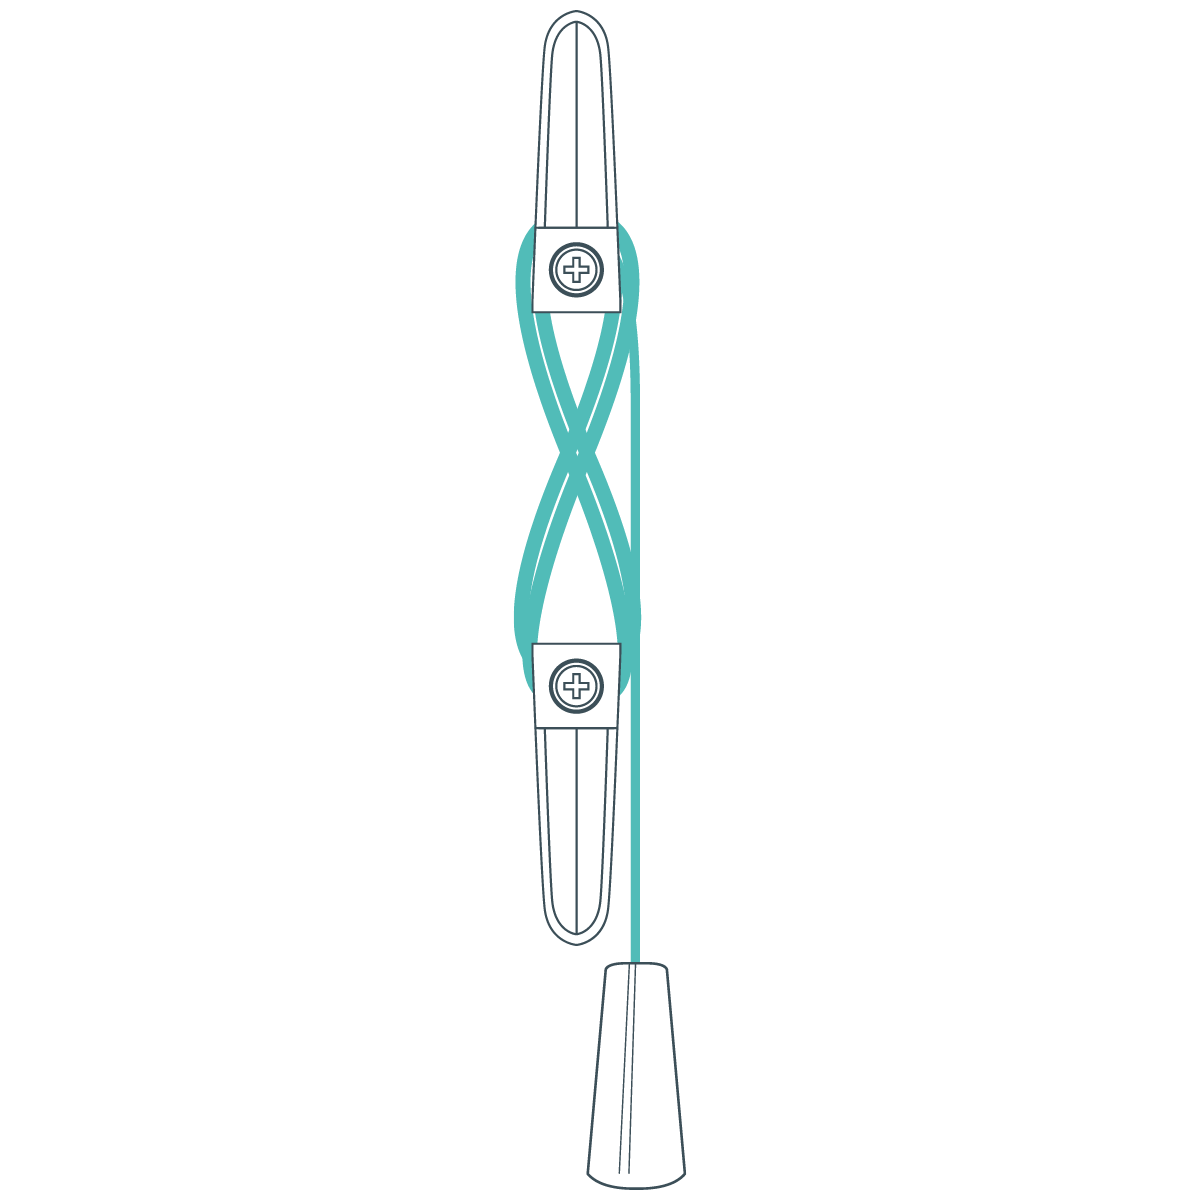
Wrap the Cords
Wrap the cords around the cord cleats in a figure of 8. When the cords are fully accumulated ensure they are secure, so when the cord is pulled no excess is released.
Step 8
Operation
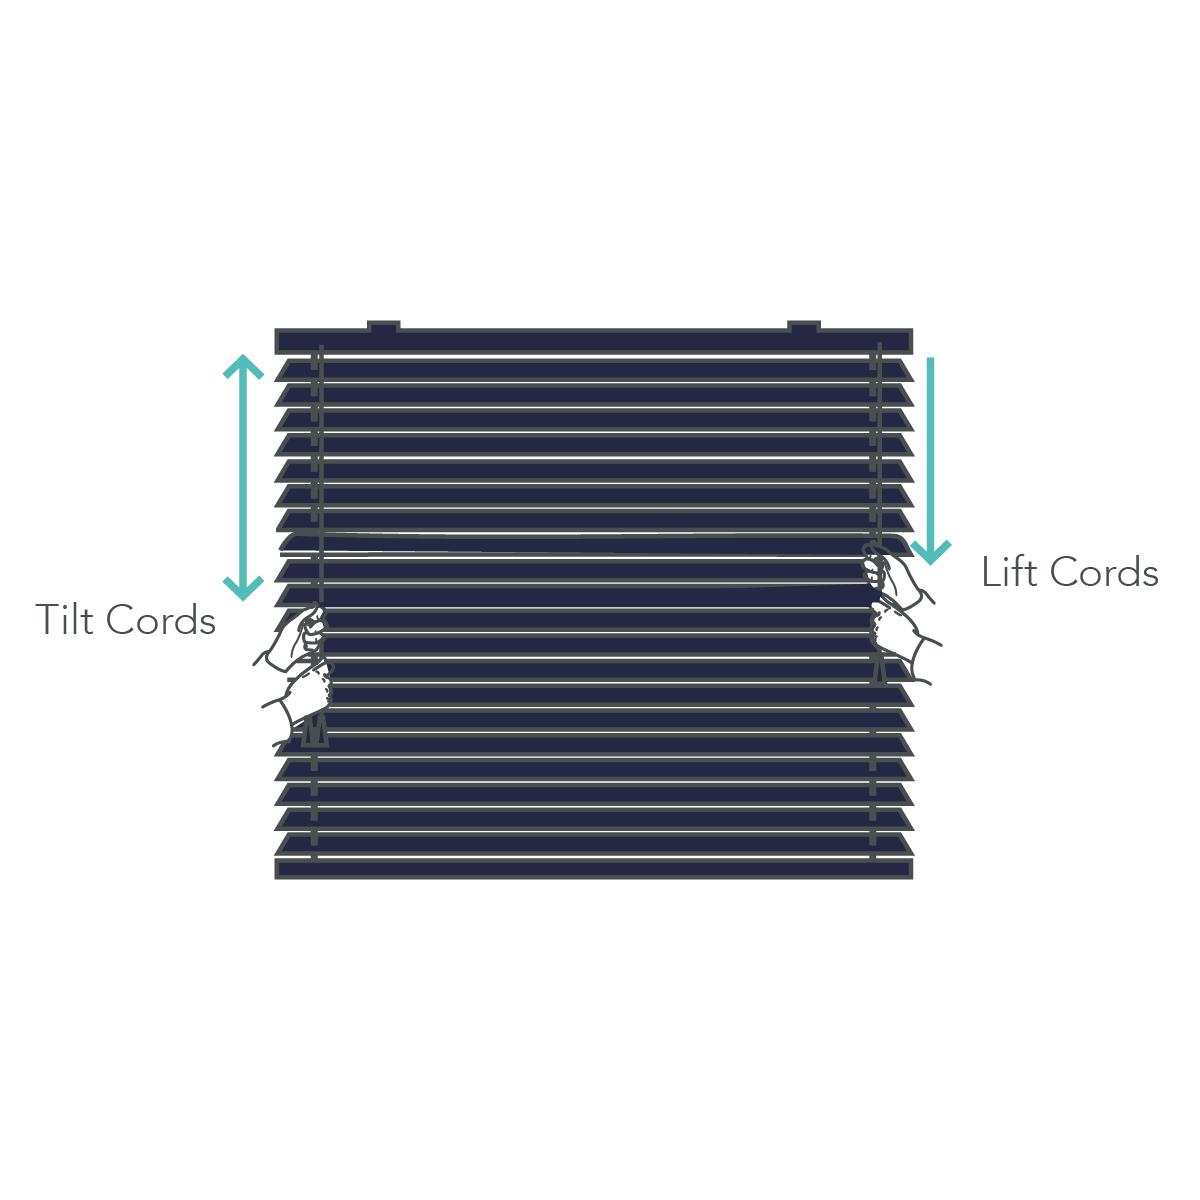
To tilt blind pull on required tilt cord tassel to tilt slats to the open or closed position. Tilt the blind to the horizontal position when lifting or raising to increase blind life.
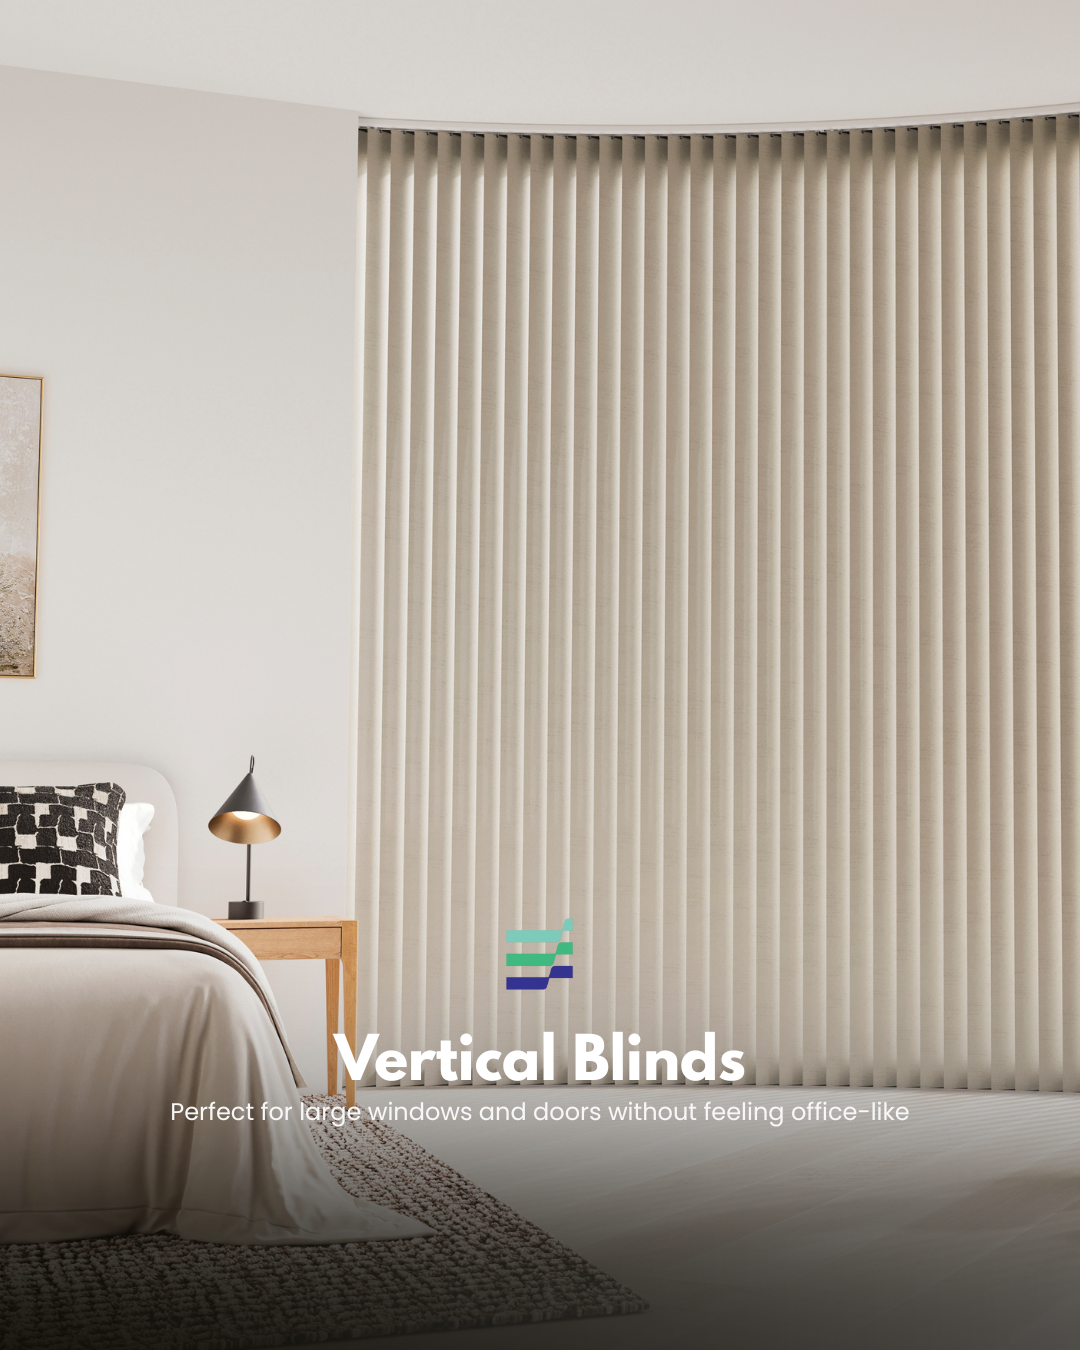
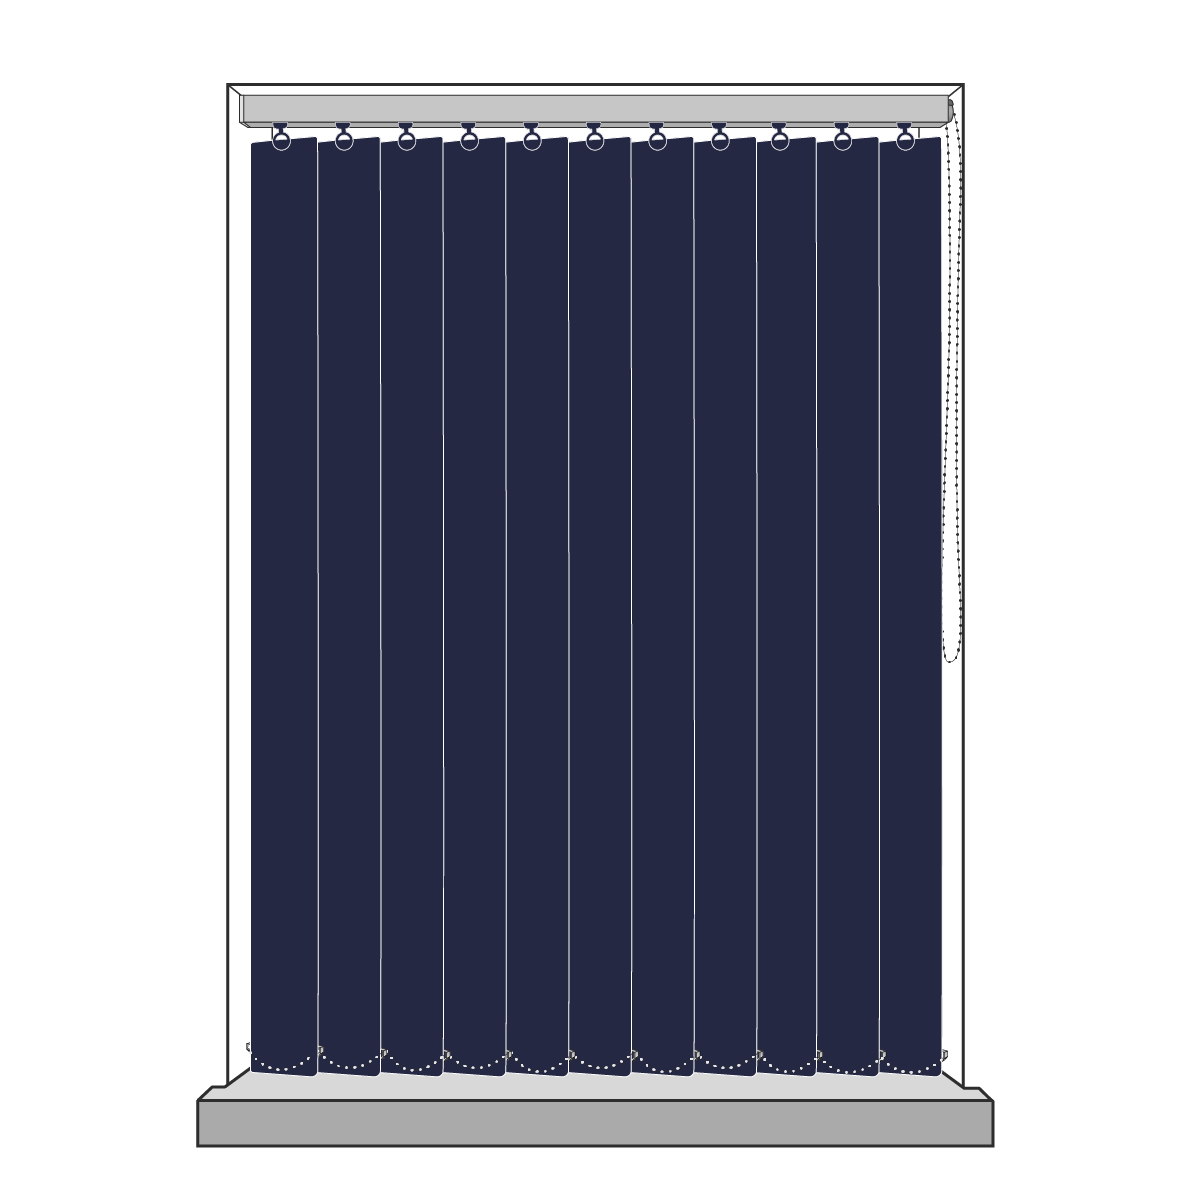
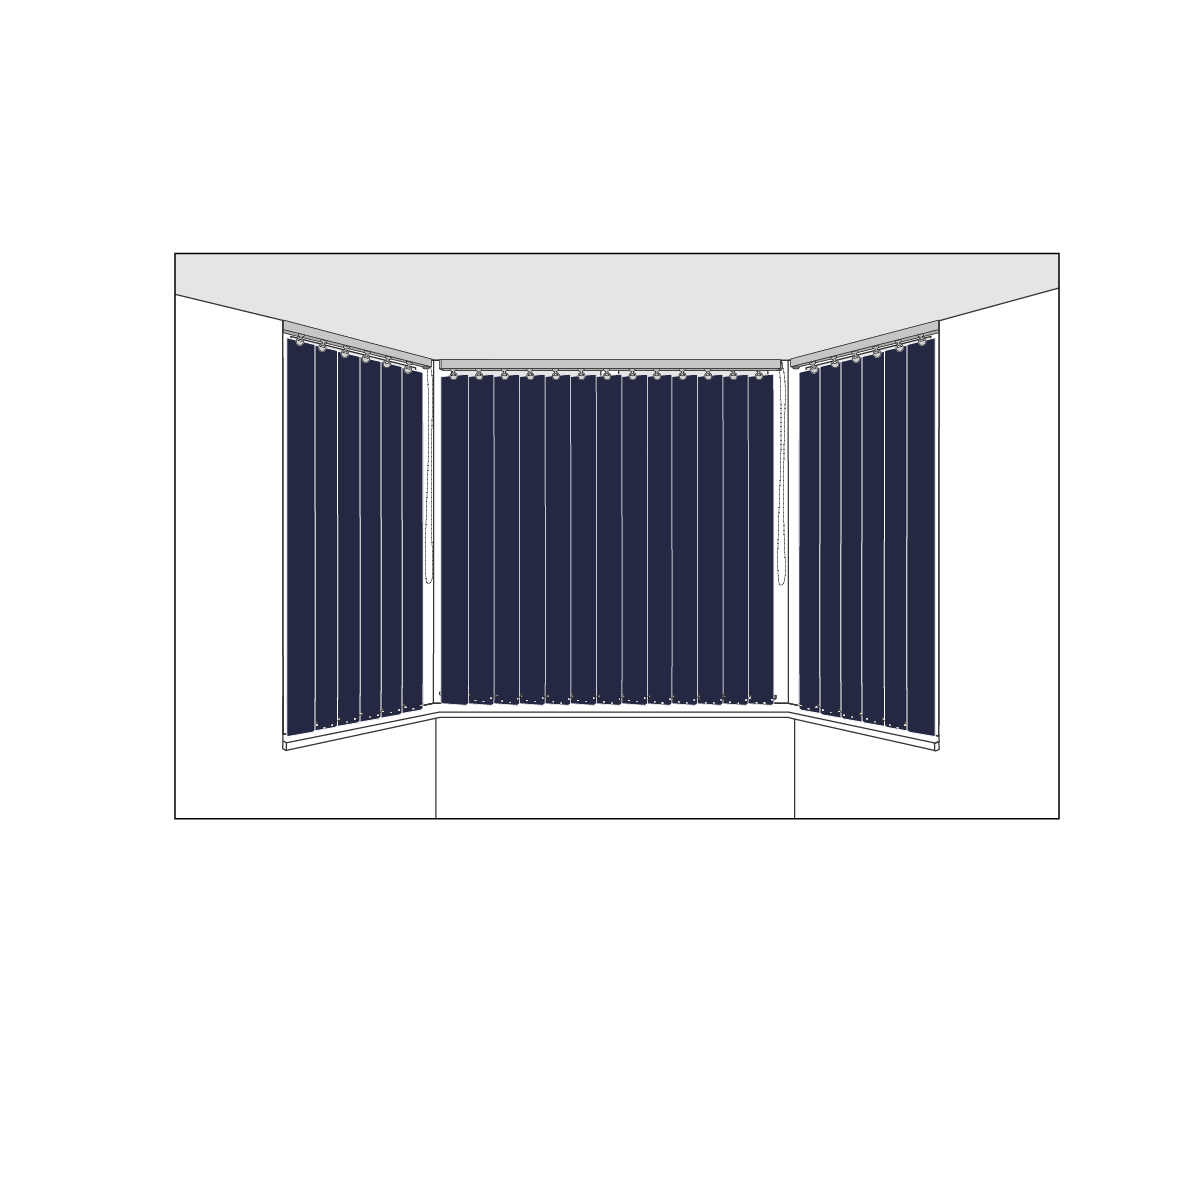
How do vertical blinds work?
Vertical blinds consist of long, vertical slats, often made of materials like fabric or vinyl, hanging from a horizontal headrail. By turning the slats using the control wand or chain, you can change the angle of the blinds to let in more or less light, and by moving them to the side, you can create an open view or complete privacy.
How to install vertical blinds - Step by Step
What comes with my vertical blind?
The fitting brackets and child safety device will be included with your vertical blinds. Screws do not come with your vertical blind, this is because the type of screws required will depend on the surface you are fitting the brackets to. Your screws need to be 4mm and suitable for the surface.
Tools you’ll need
To install your new blinds you will need the below tools.
How to mount vertical blind brackets
Note: Your vertical blind will come with two bracket options. Face fix brackets are for fitting to the wall or window frame. Top fix brackets are for fitting your blind to the ceiling or within the window recess. Follow each step for whichever bracket you are using.
Step 1

Bracket Positioning
If you’re fitting the blind inside the recess you can top fix the brackets to the lintel or face fix the brackets to the window frame.
If you’re fitting the blind outside the window recess ensure that measurement (C) in the diagram above is the same to ensure even window coverage.
Step 2
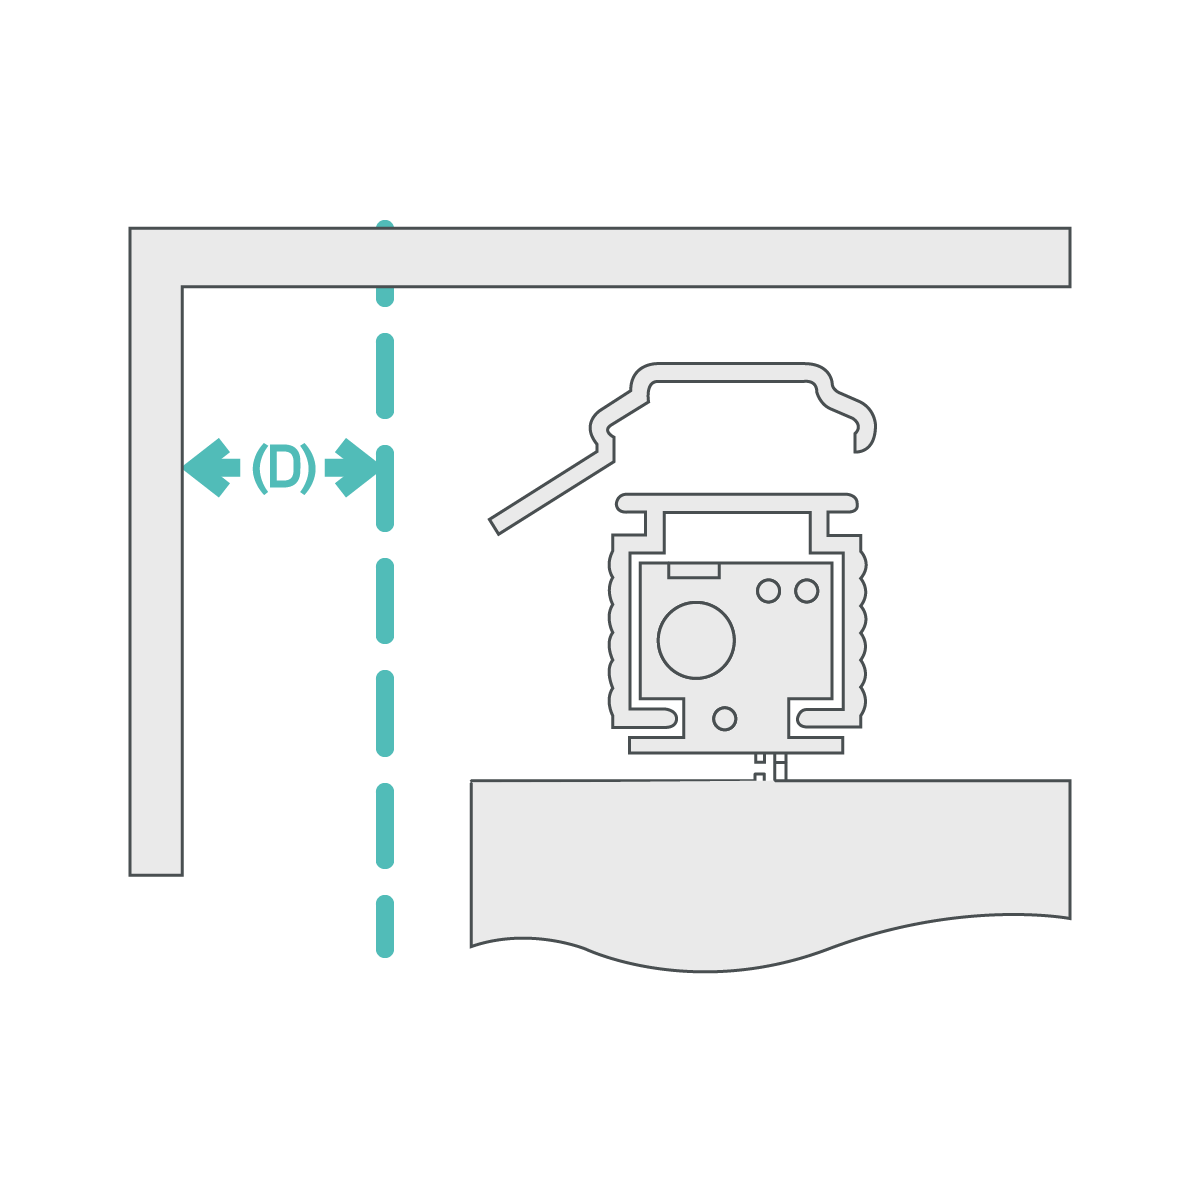
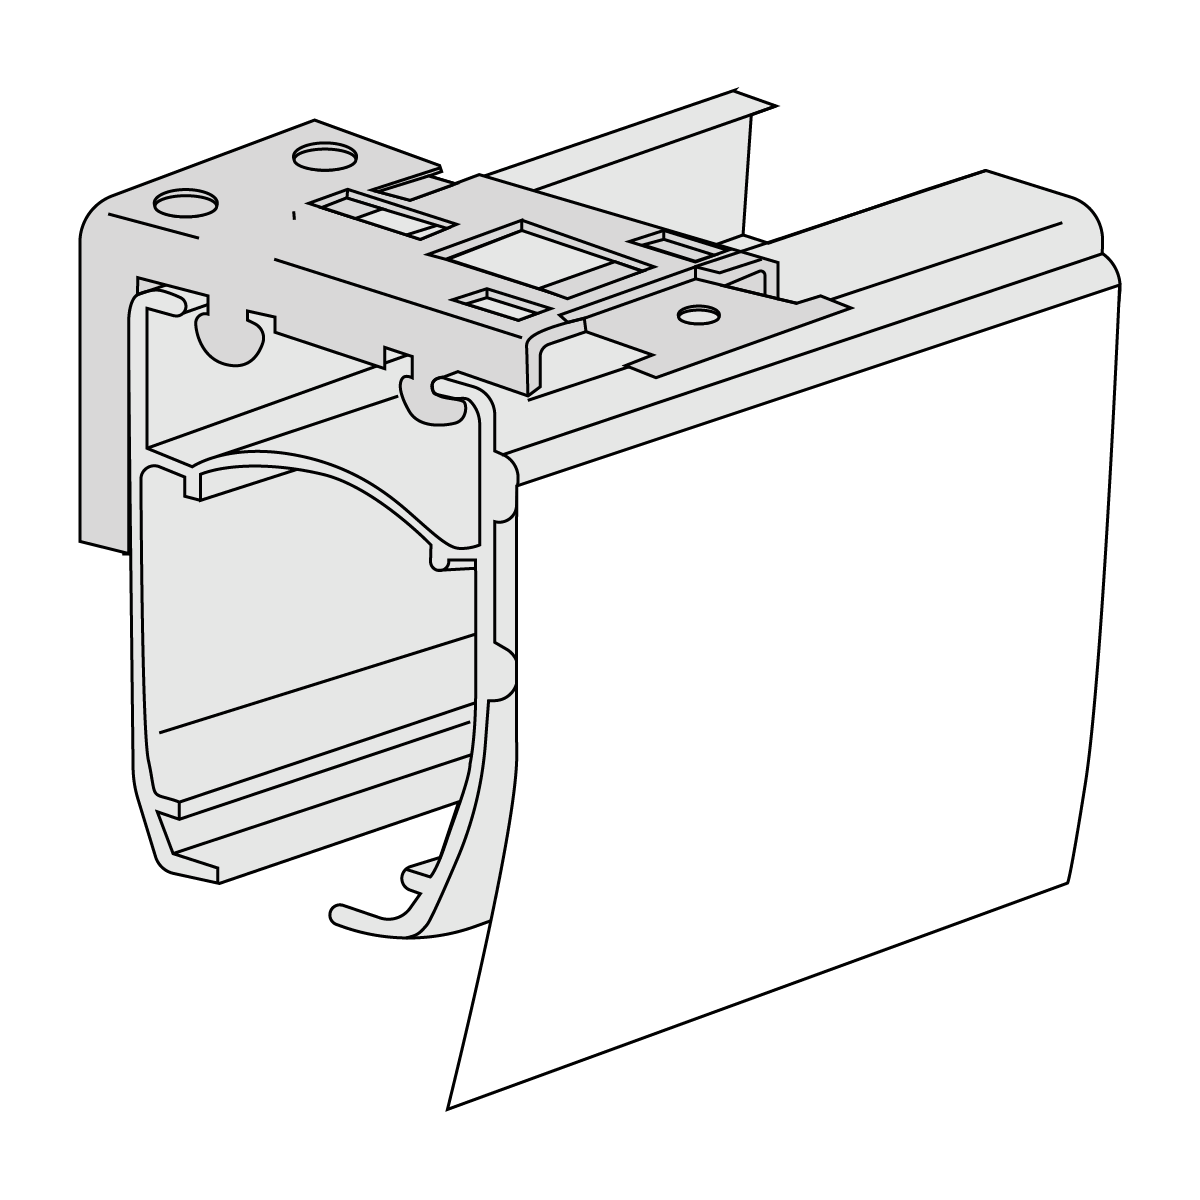
Option 1: Top Fixing
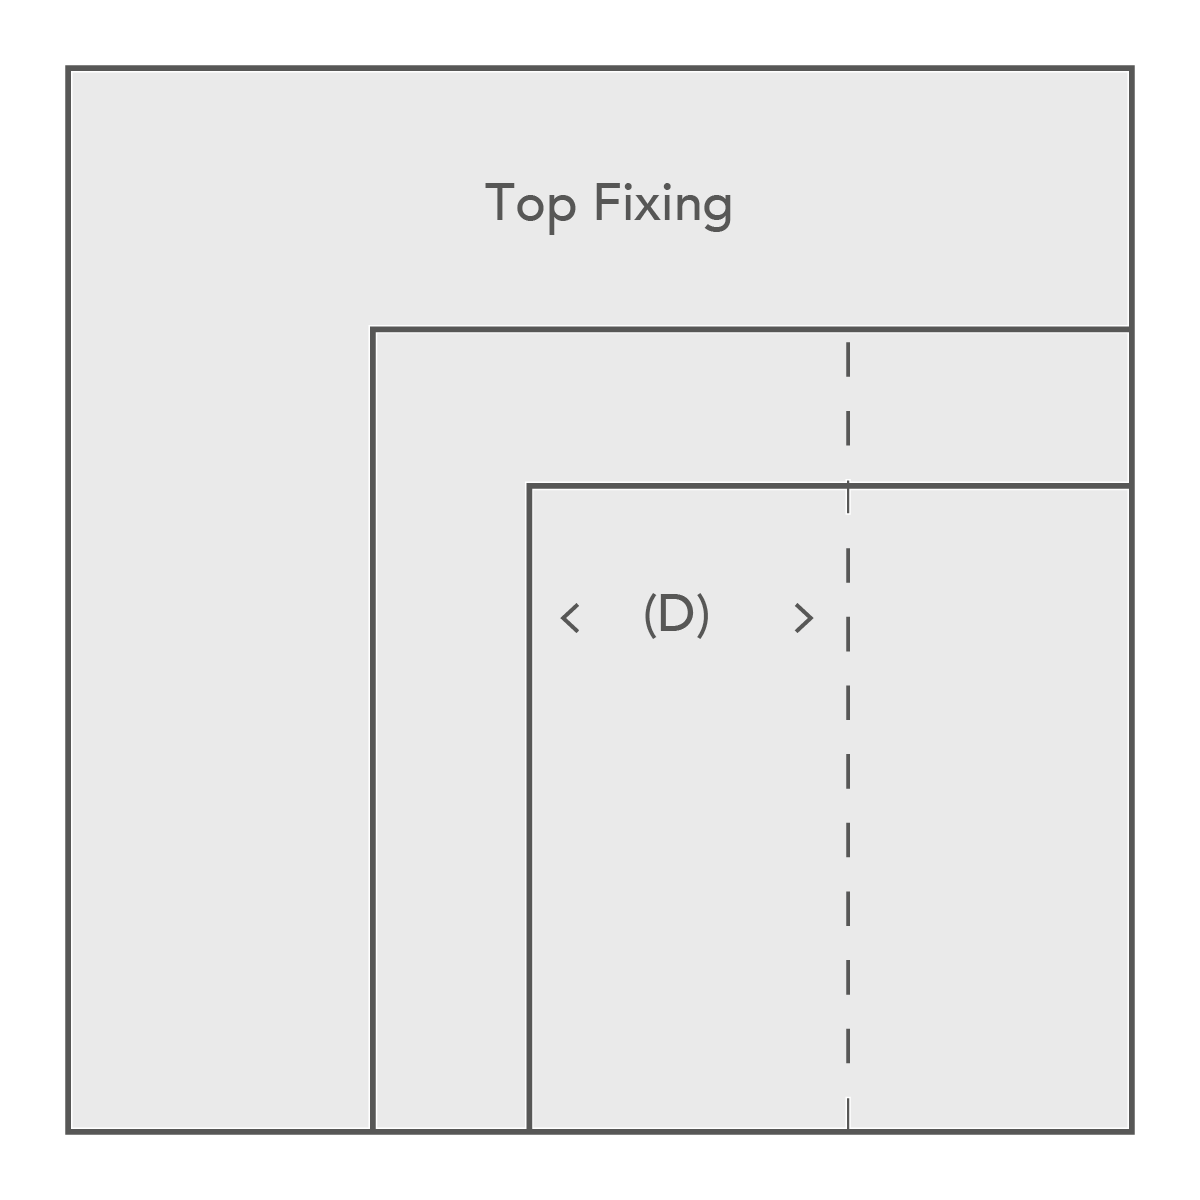
If you’re fixing the bracket to the underside of the window recess, measure and mark the distance (D), allowing for obstructions like handles that protrude into the recess area. Position the brackets approx. 5cm from the ends of where the headrail is to be positioned. If more than 2 brackets are supplied, fit the additional brackets at equal spacing across the length of the blind. Please ensure fixings are suitable for the wall/surface to which you are mounting the brackets.
Option 2: Face Fixing
If you’re fixing the brackets to the face of the wall, or the window frame, position the brackets approximately 5cm from the ends of where the headrail is to be positioned. If more than 2 brackets are supplied, fit the additional brackets at equal spacing across the length of the blind. Please ensure fixings are suitable for the wall/surface to which you are mounting the brackets.
Step 3

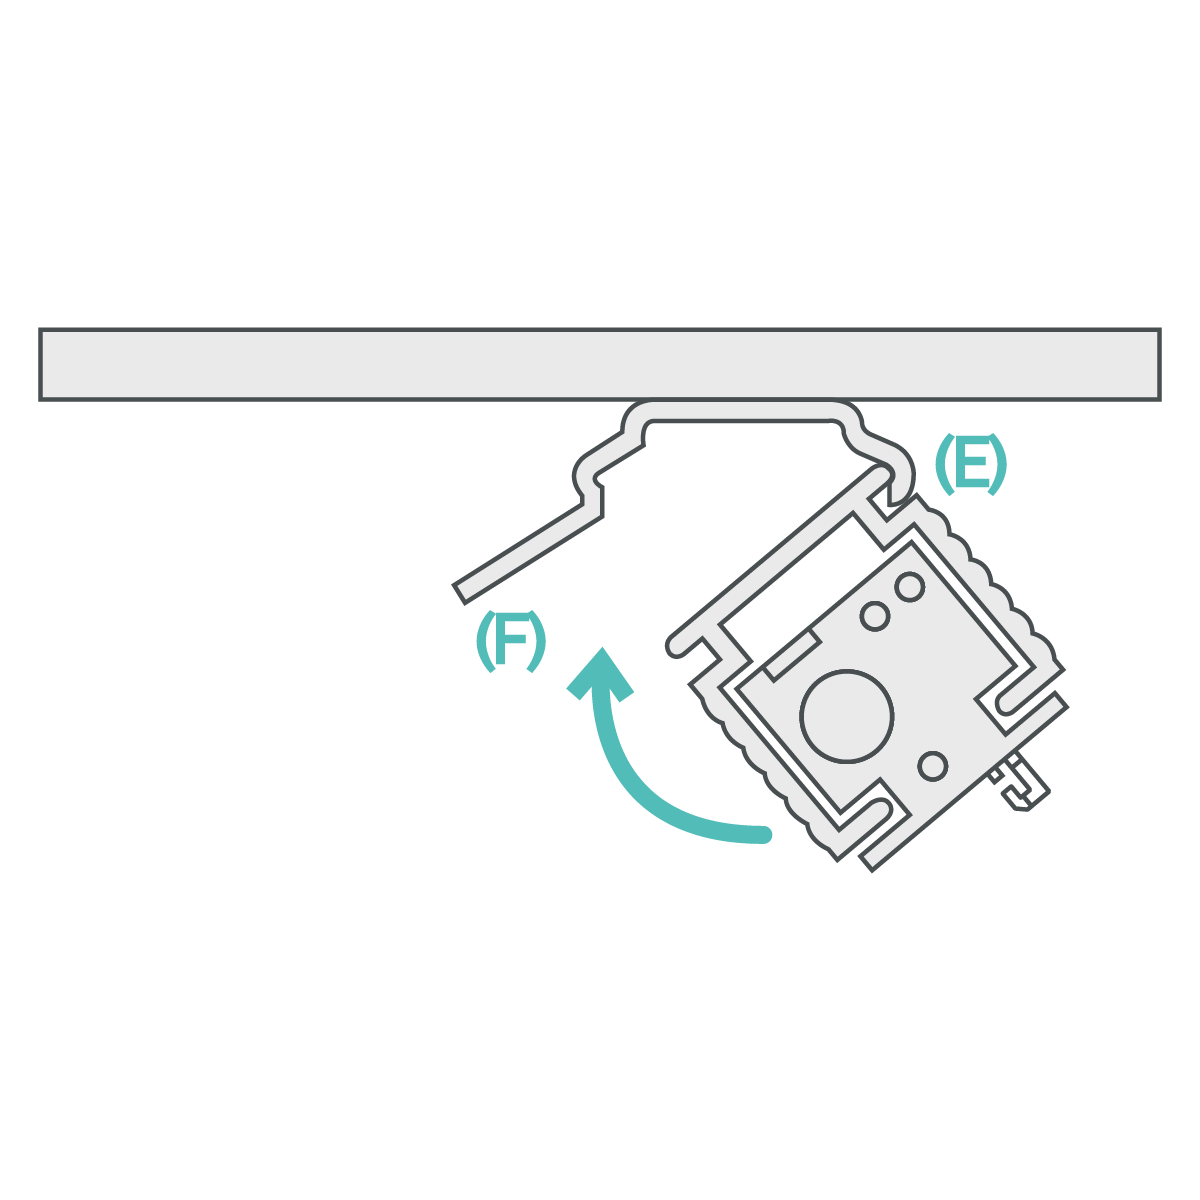
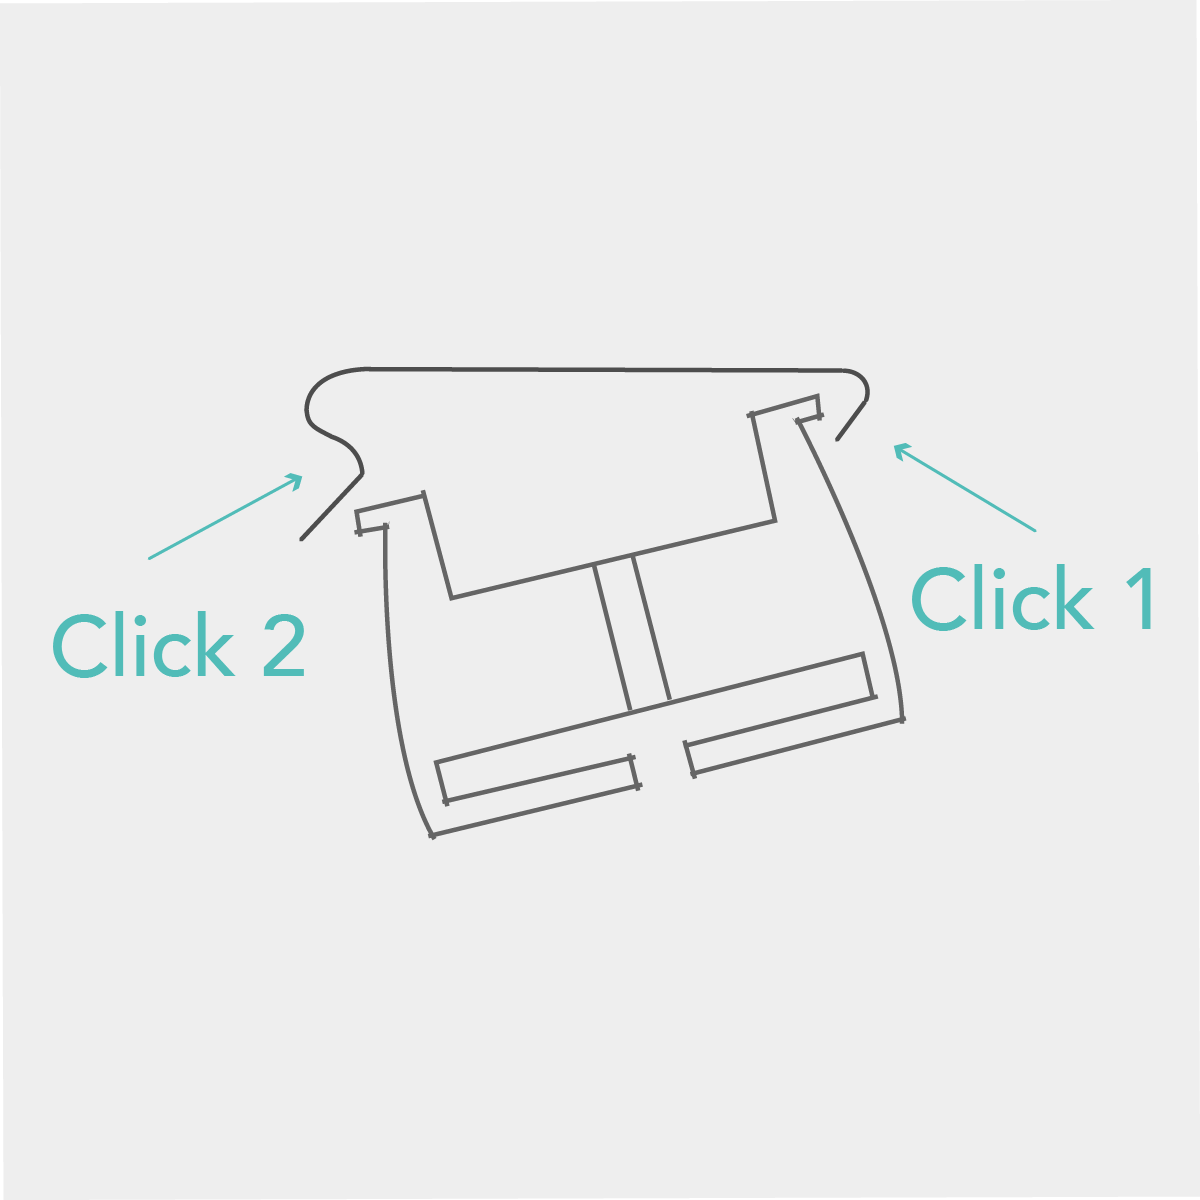
Option 1: Top Fixing
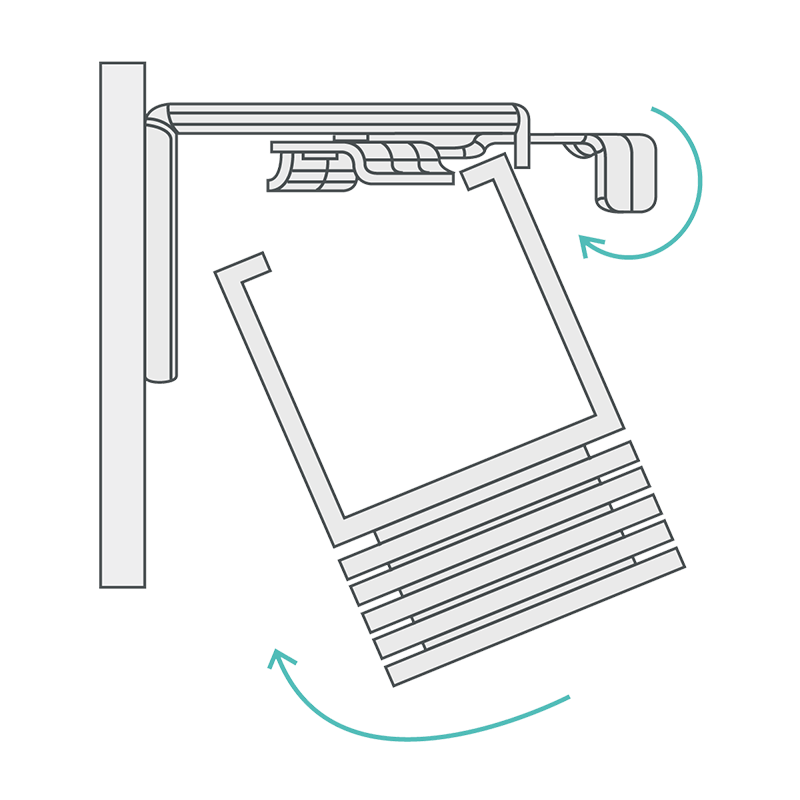
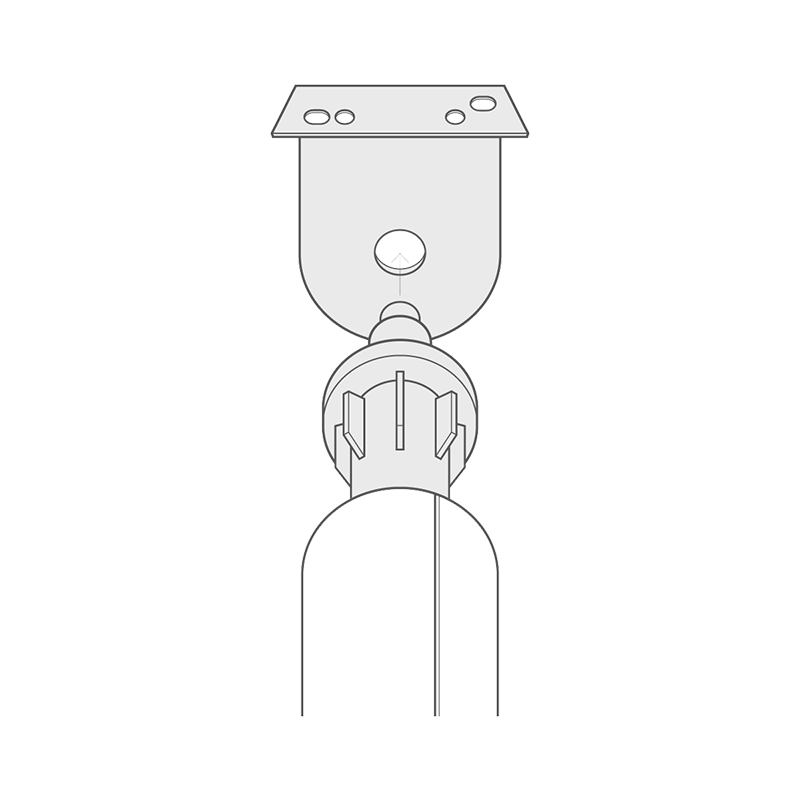
Tilt and hook headrail into bracket at point (E). Rotate the headrail into position until it clicks. To release the headrail push the bracket at point (F) as shown in the diagram above.
Option 2: Face Fixing
Hook the back of the headrail into the bracket and rotate the headrail into position. Secure headrail by tightening the short screw in the front of the bracket.
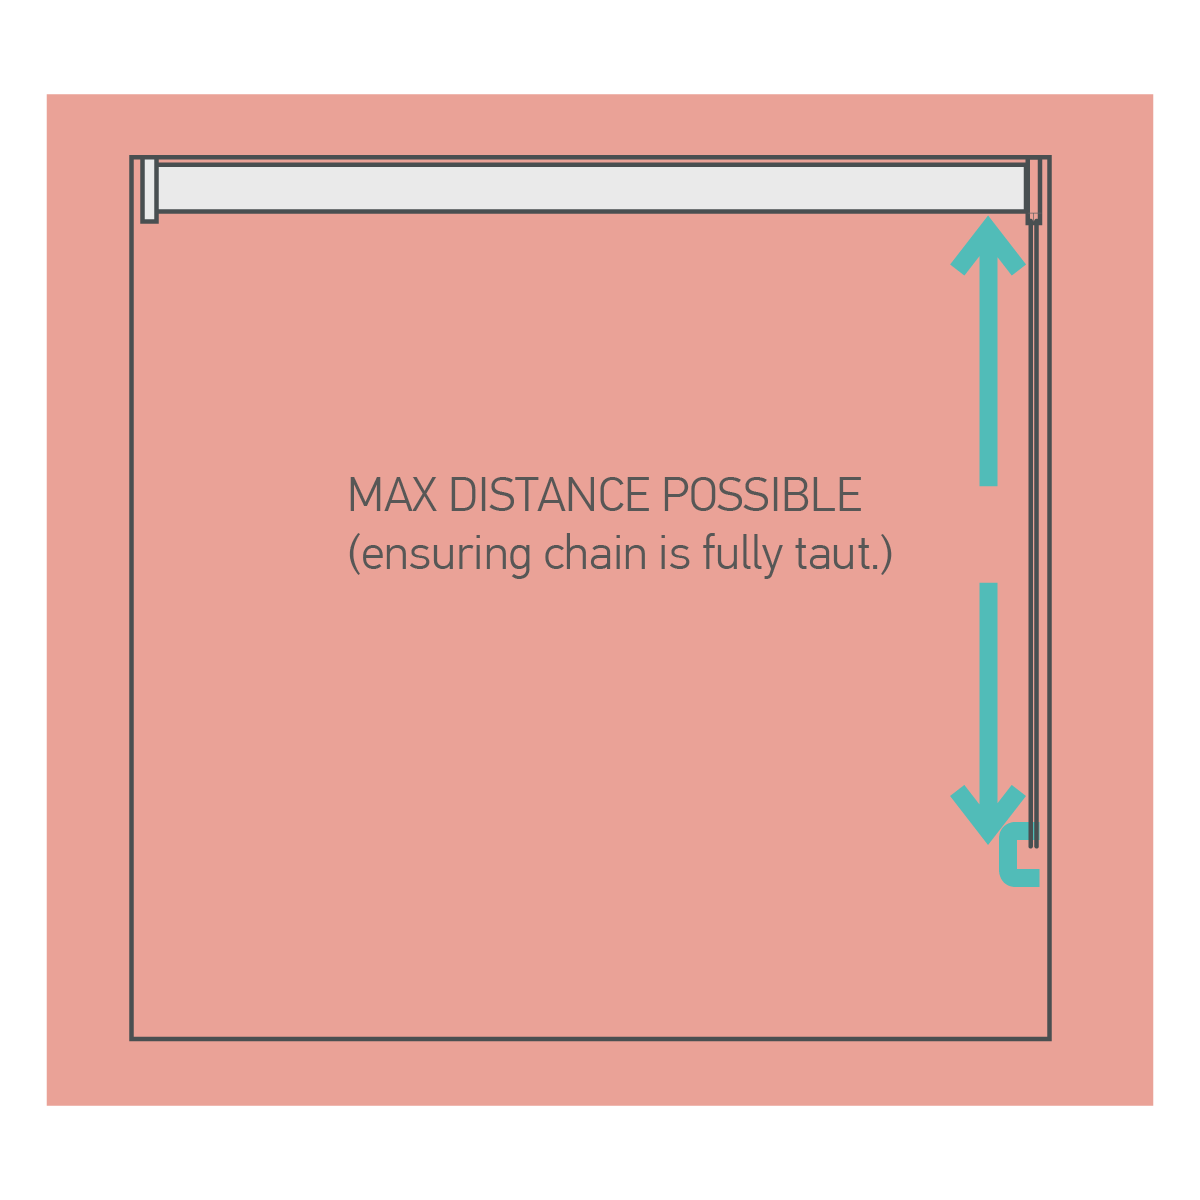
Step 4 - Safety device

Safety Device Position
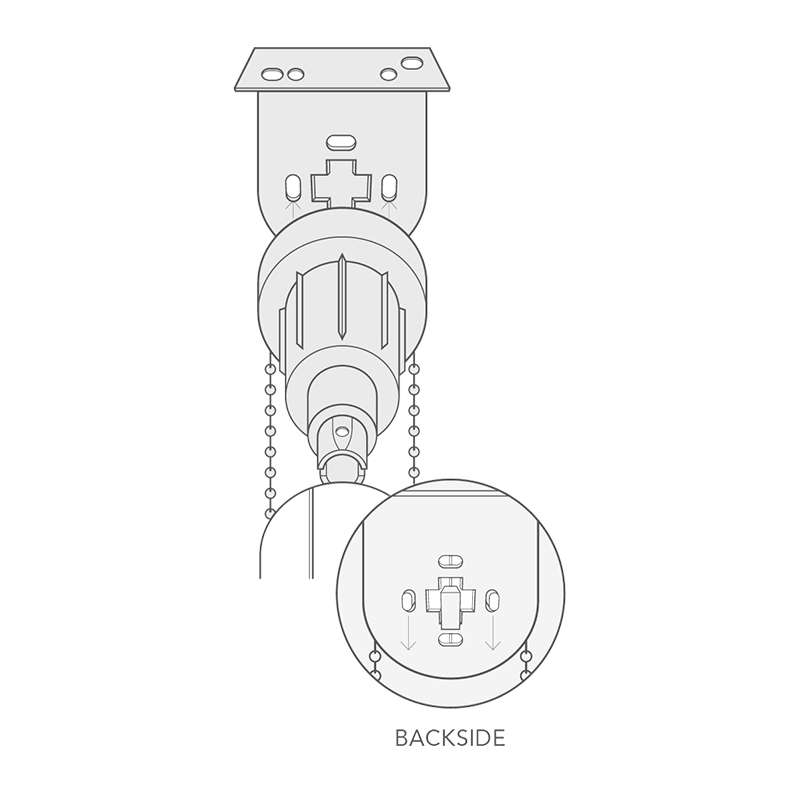
The safety device must be installed at the maximum distance possible from the control mechanism to prevent looped chain from becoming slack. The chain should be taut. Place the safety clip on the wall and mark the positioning of the 2 screw holes, then drill two suitable holes.
Securing the Safety Device
Screw the safety device securely to the wall.
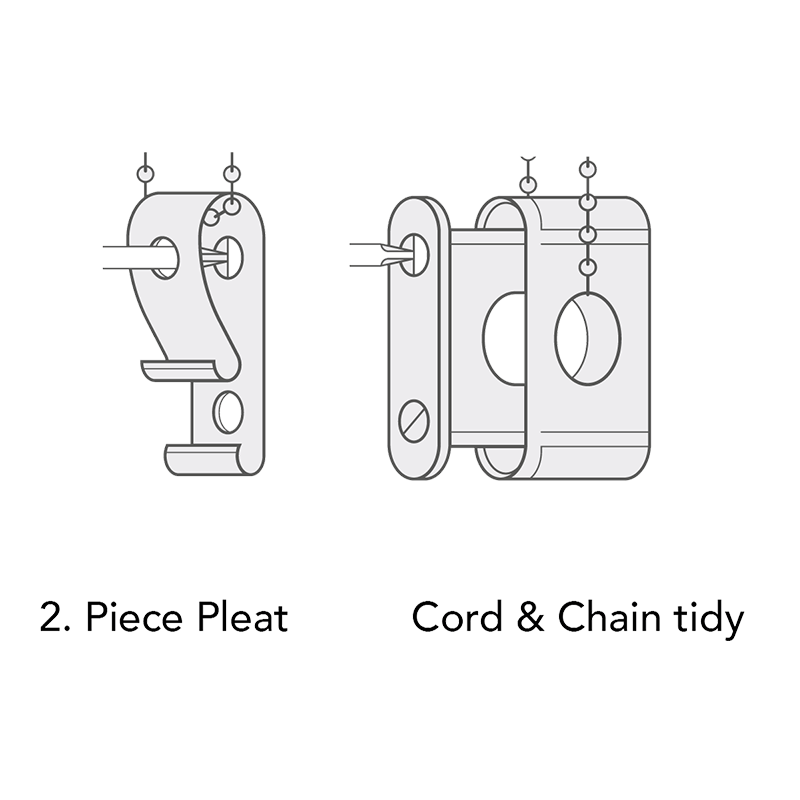
Replacement slats - Step 1
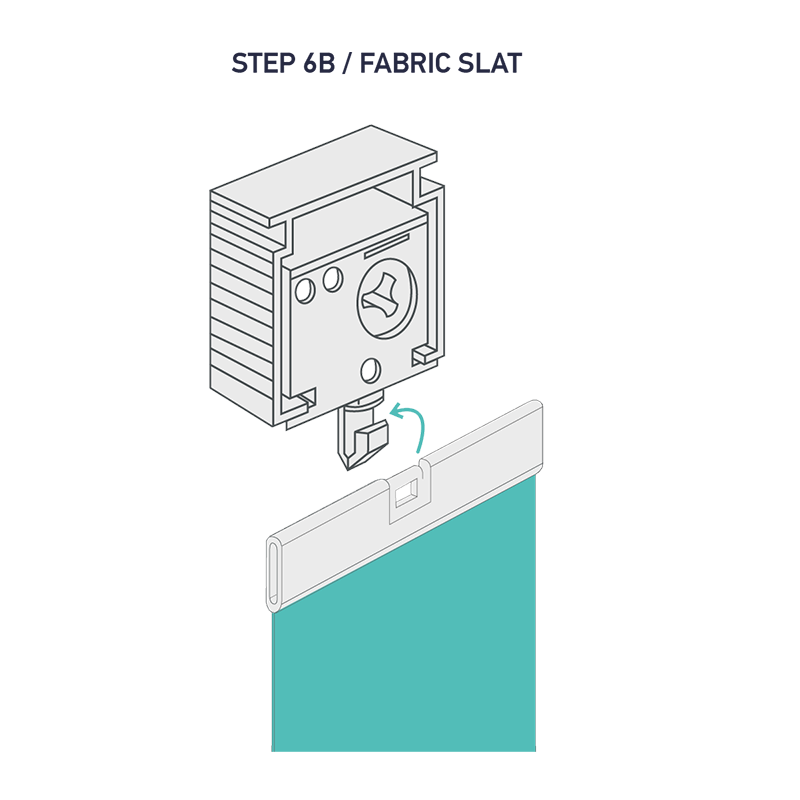
Attaching Fabric Vertical Slat
Use this step if your slats are from the fabric range, you can tell by the type of headrail traveller and slat fitting you’ve been supplied. With the headrail fitted hook each fabric slat into the headrail travellers ensuring the traveller pegs are in the open position.
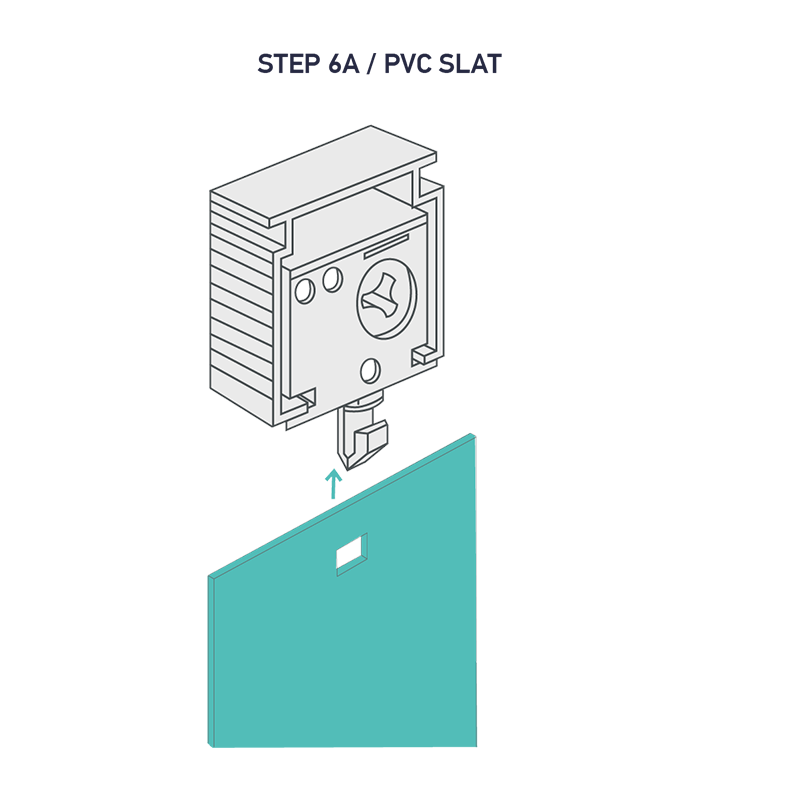
Attaching PVC Vertical Slat
Use this step if your slats are from the PVC/Waterproof range, you can tell by the type of headrail traveller and slat fitting you’ve been supplied. With the headrail fitted hook each fabric slat into the headrail travellers ensuring the traveller pegs are in the open position.
Step 2
Bottom Weights & Stabilising Chain
If your vertical blinds has a separate bottom weight, insert the weights into the vertical slat bottom pockets.
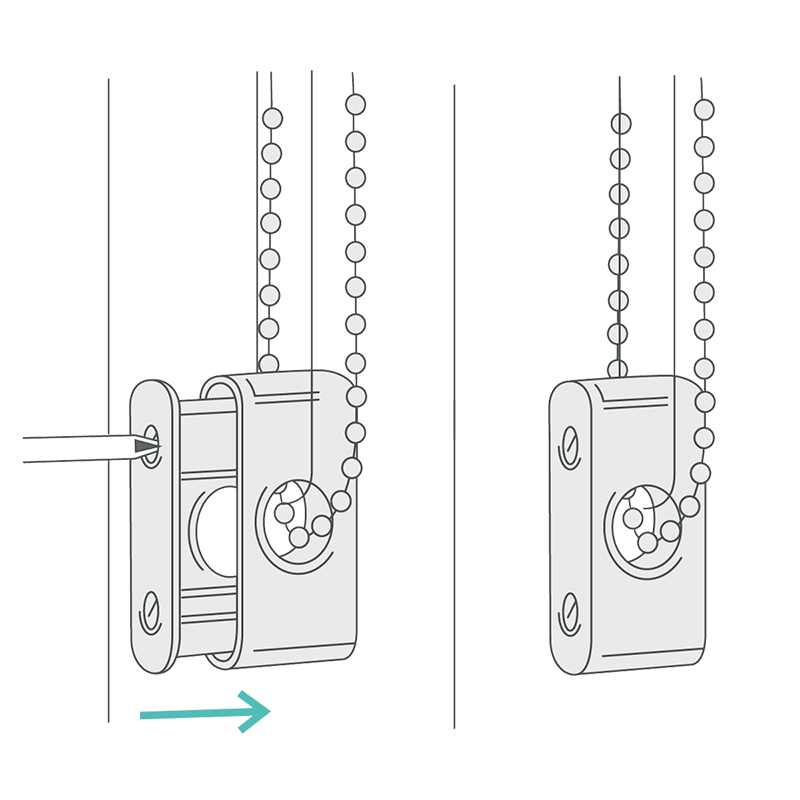
Push connector on stablilising chain onto the ear of each bottom weight. Stablising chain should be connected to both sides of the blind.
Maintenance
Visual Checks
Your new blinds is maintenance free, however we recommend that regular visual checks are completed to ensure that no components have been damaged, which could result in operating difficulties and/or cause a safety risk.
If any maintenance is required please contact us right away.
Warning

Child Safety
Young children can be strangled by loops in pull cords, chains, tapes and inner cords that operate the product.
To avoid strangulation and entanglement, keep cords out of the reach of young children. Cords may become wrapped around a child’s neck.
Move beds, cots and furniture away from window covering cords. Do not tie cords together. Make sure cords do not twist and create a loop.
What You'll Need
To install your new blinds you will need the below tools.
Note: You’ll need to supply your own screws because the type of screw depends on the surface you’re attaching the blinds to. Make sure to use screws that are 4mm wide and are right for the material you're fixing them into.
Fitting Instructions - Free Hanging
Ensure that brackets are positioned a suitable distance away from any window, door handles or any other obstructions to allow the blind to operate smoothly.
Step 1

Recess Fitting
Outside Recess
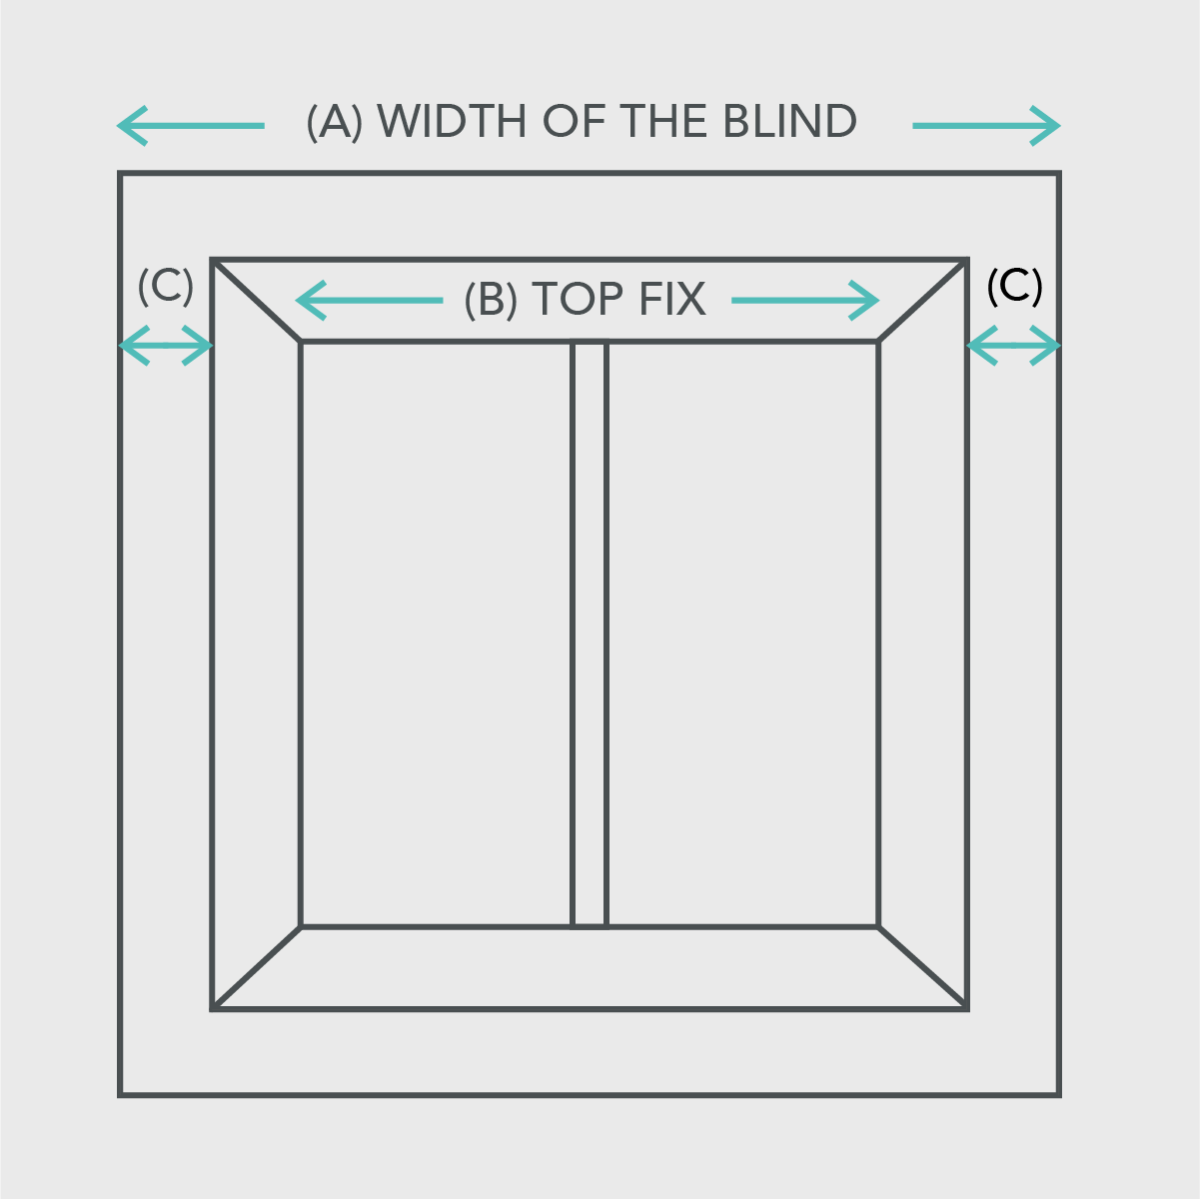
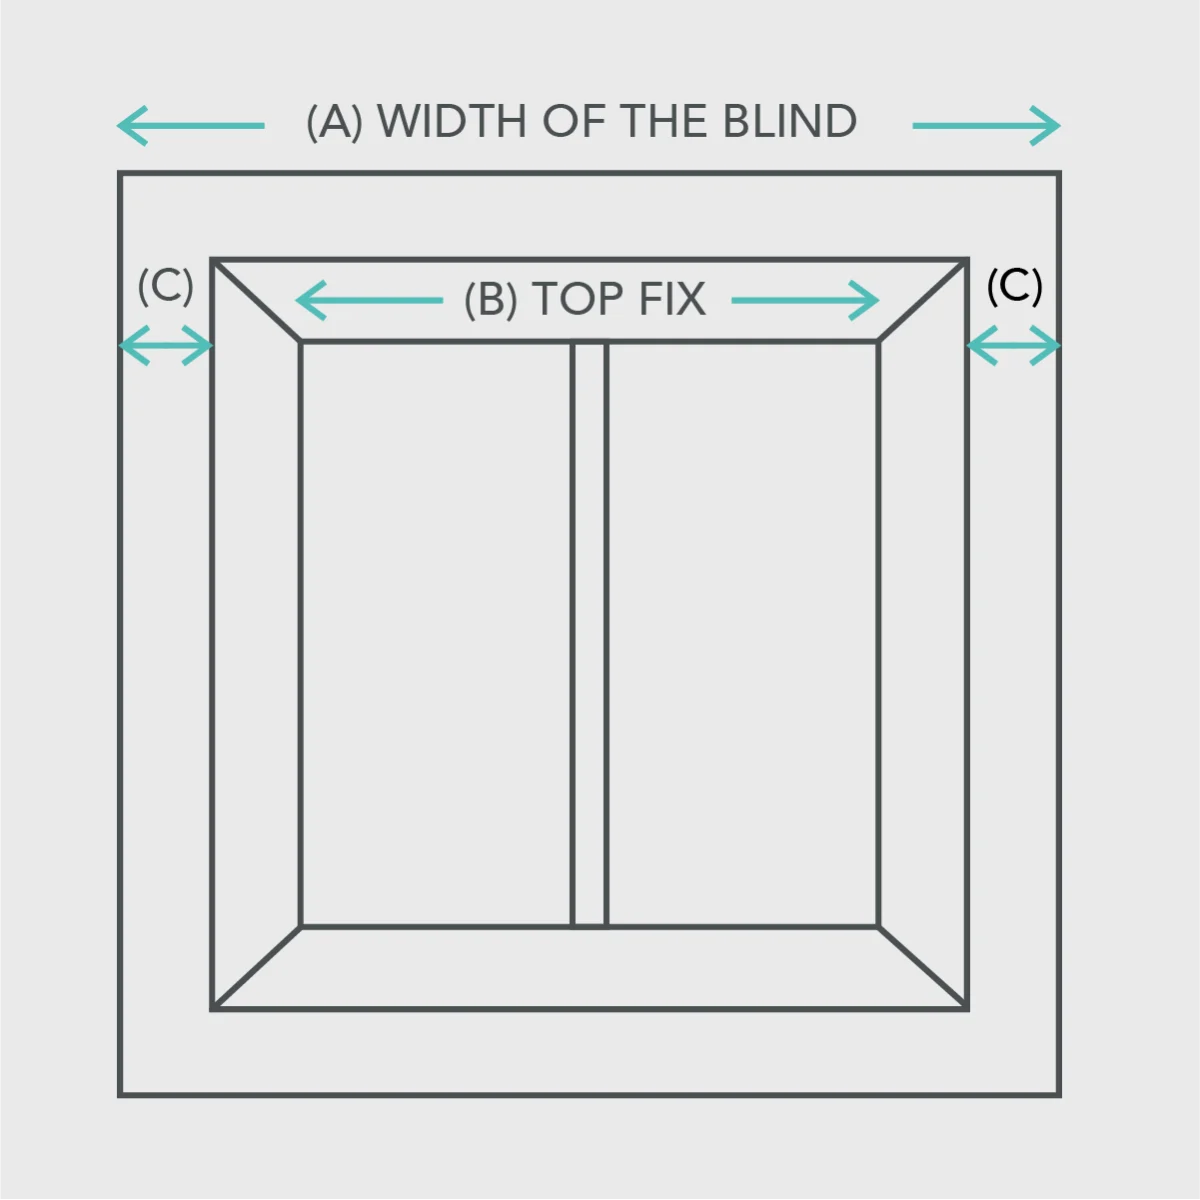
If you are mounting the pleated blind outside the window recess, ensure that dimension C is the same on both sides. Follow the instructions for wall mounting. To calculate C, use the formula: (A-B)/2.
Inside Recess
For ceiling mounting, attach the blind to the lining. For wall mounting, attach it to the window frame.
Roof Assembly
Measure and mark the distance between the wall and the back of the bracket, considering any obstacles like protruding handles. Position the mounting brackets evenly along the pleated curtain. Hold each bracket in place and mark the hole locations. Ensure the screws you use are appropriate for the wall or surface you are mounting on.
Step 2
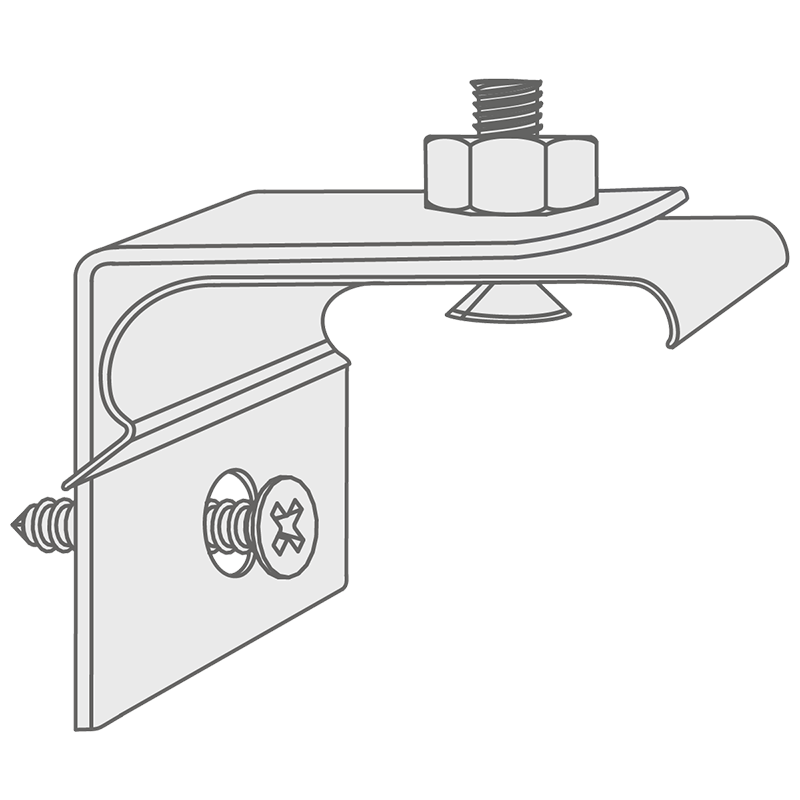
Wall Mount
Assemble the roof bracket with the other bracket. Use the nuts and bolts provided to assemble them. Use the image above to understand how to put them together.
Step 3
Inserting the Headrail
Insert the head rail into the brackets as shown, then push it up until it clicks into place completely.
Step 4
Child Safety
The safety device must be mounted as close to the top rail as possible and always at least 1500 mm above the floor. The cord must be completely wrapped around the safety device when the pleated blind is not in use.
Place the safety device in the desired position on the wall and mark the hole positions with a pencil. Use suitable screws to securely fasten the safety device to the wall.
Wrap the ropes around the safety device. When the ropes are wound - make sure they are wound properly.
NOTE! - CHILDREN CAN BE INJURED IF A SAFETY DEVICE IS NOT INSTALLED. ALWAYS USE A SAFETY DEVICE TO KEEP ROPES AND CHAINS OUT OF THE REACH OF CHILDREN.
Attaching the Safety Cleat
There is a safety cassette on the ropes so that it breaks when a strong horizontal pull occurs on the ropes to reduce the risk of getting stuck. Use suitable screws to attach the safety cleat securely to the wall.
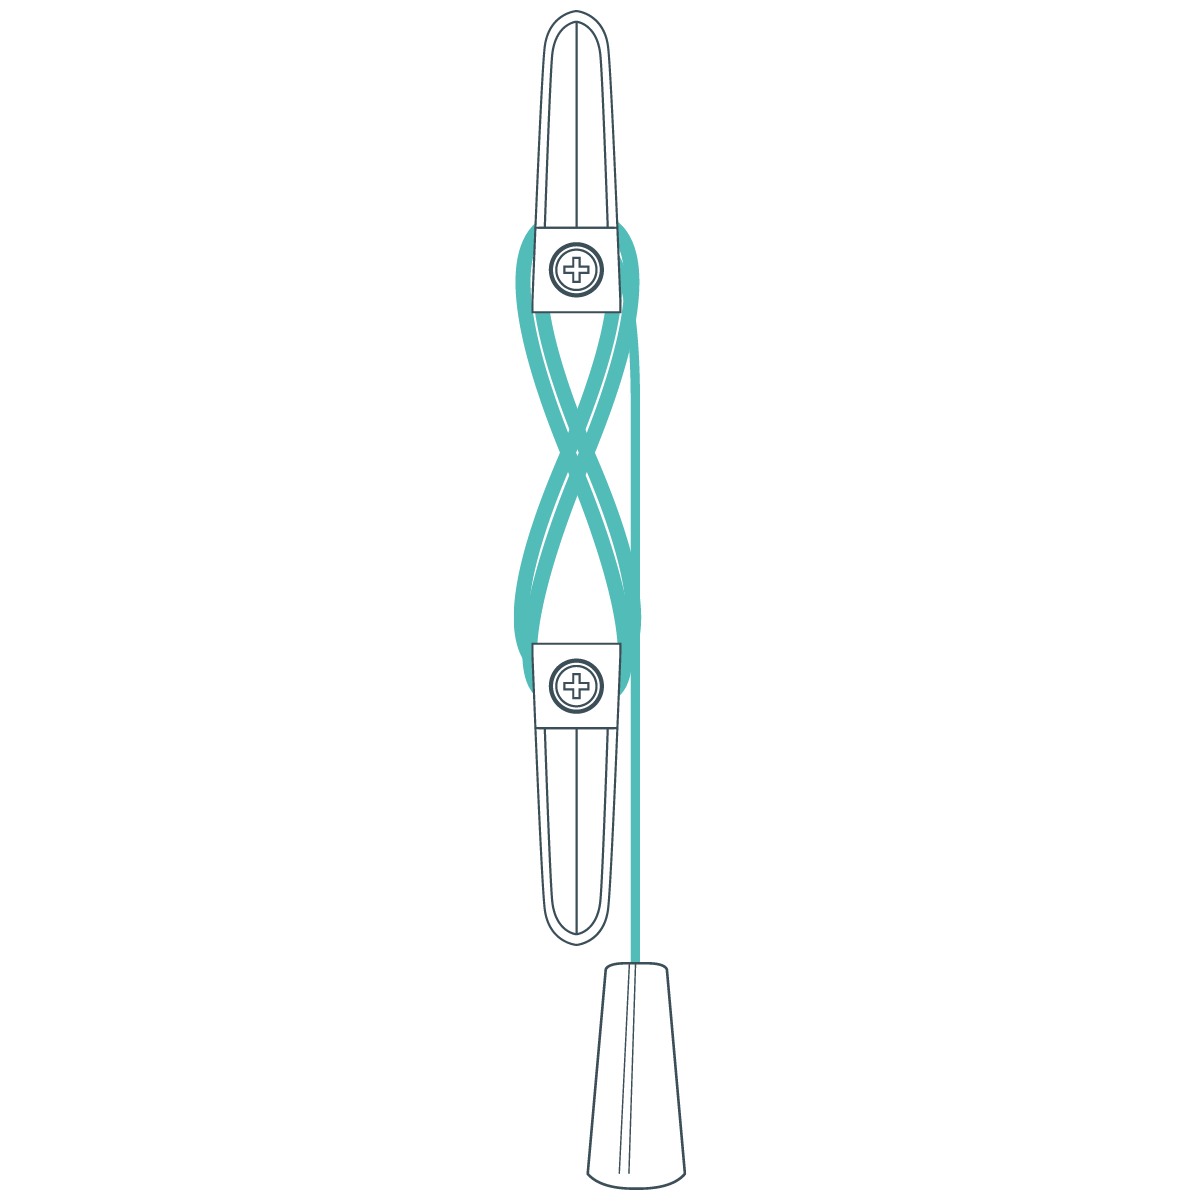
Wrapping the Cords
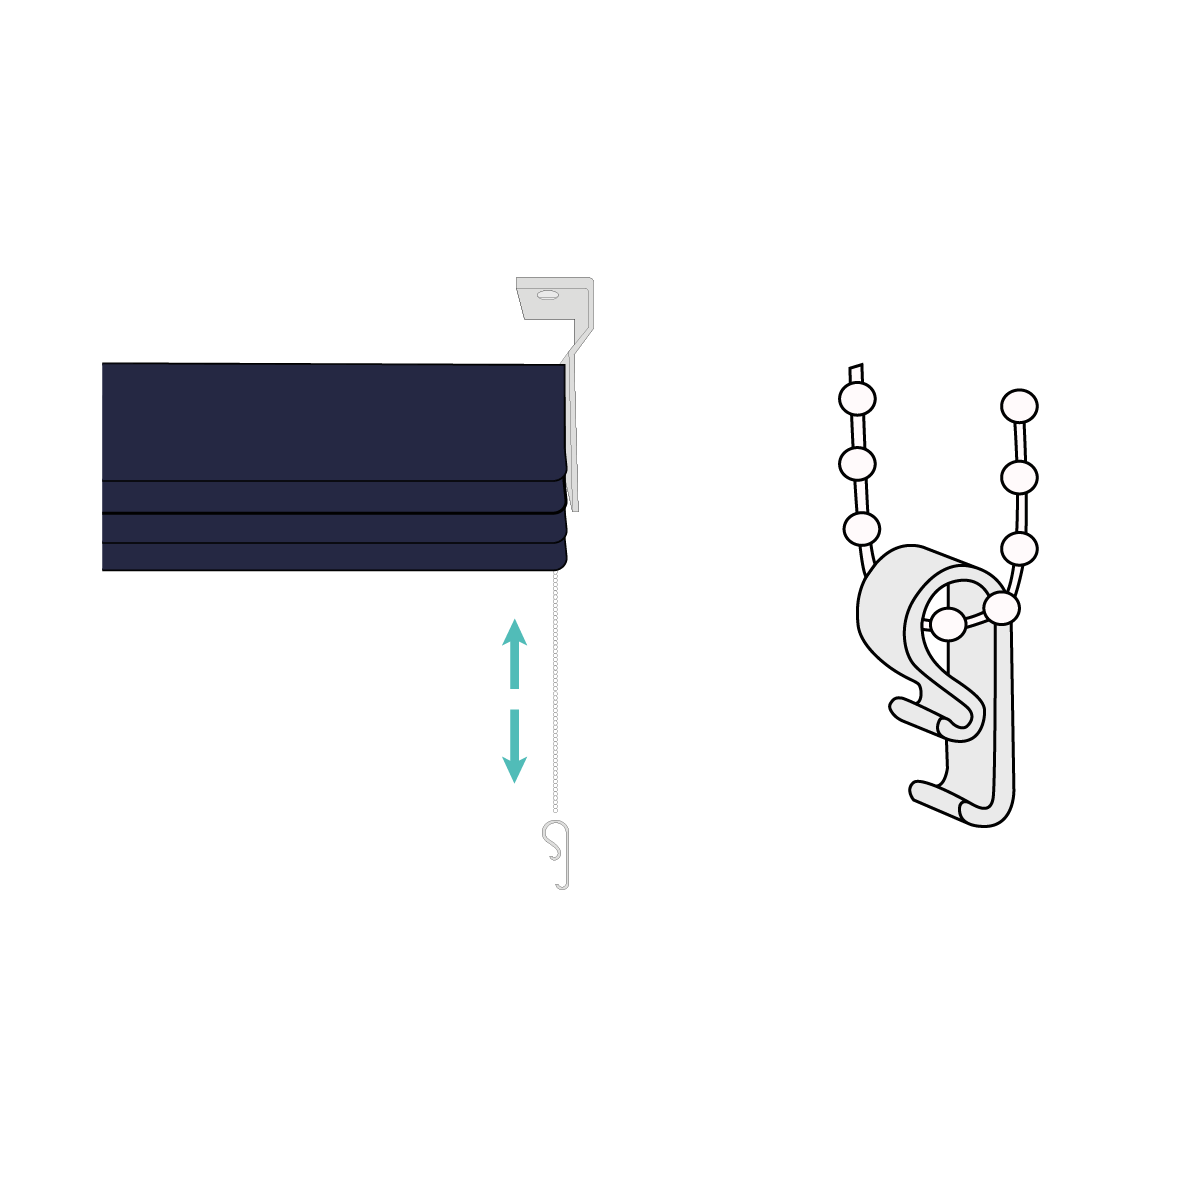
Wrap the cords around the cord cleats in a figure of 8.
When the cords are fully accumulated ensure they are secure so when any cord is pulled no excess cord is released.
Step 5
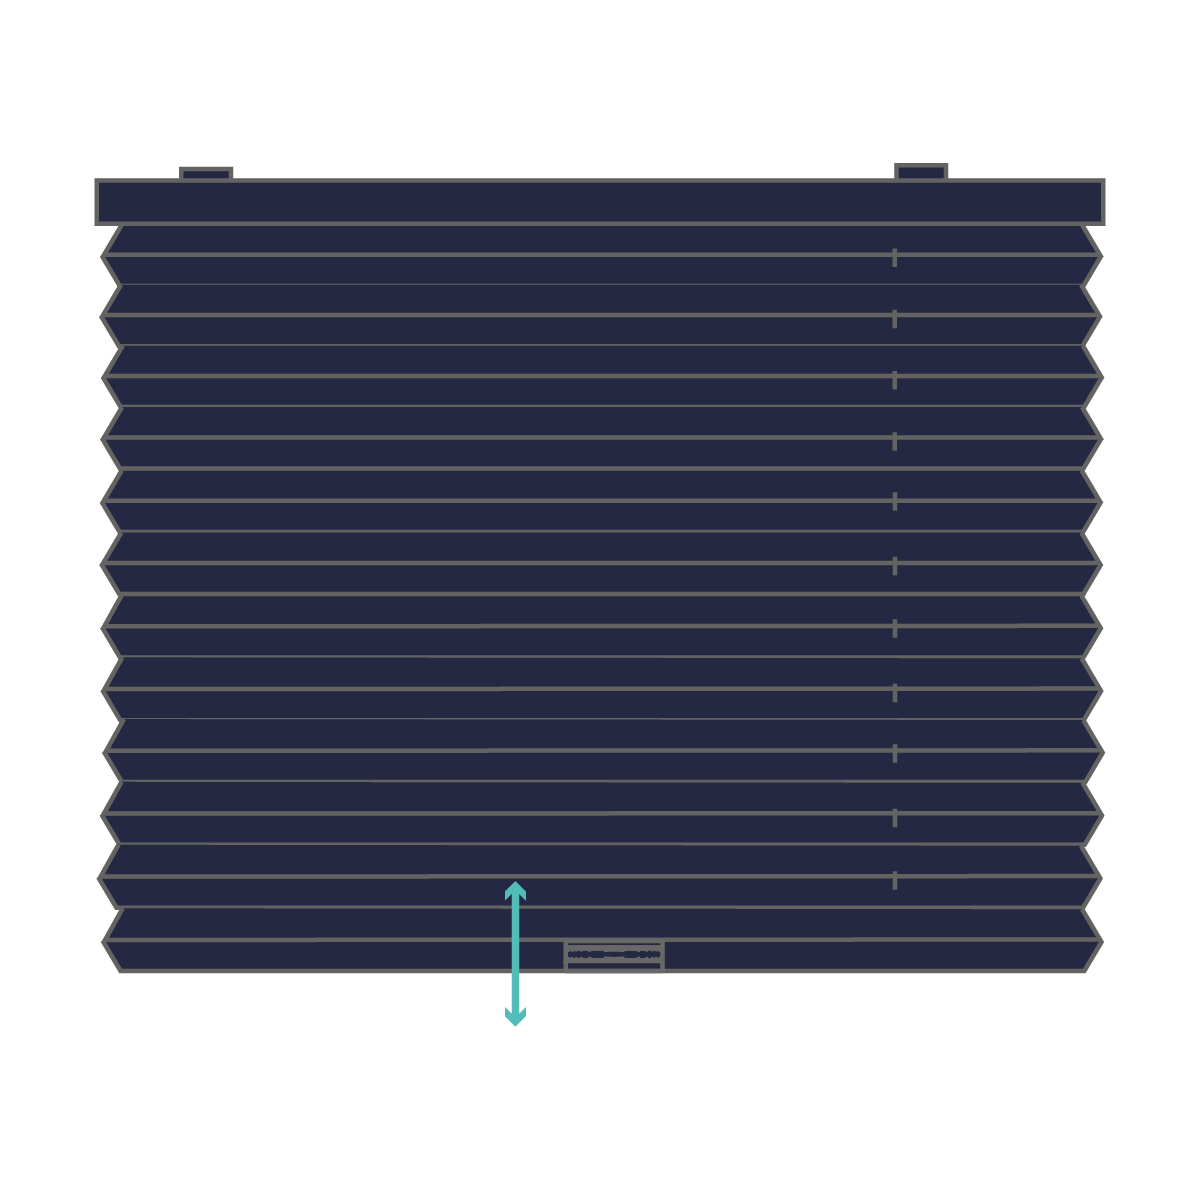
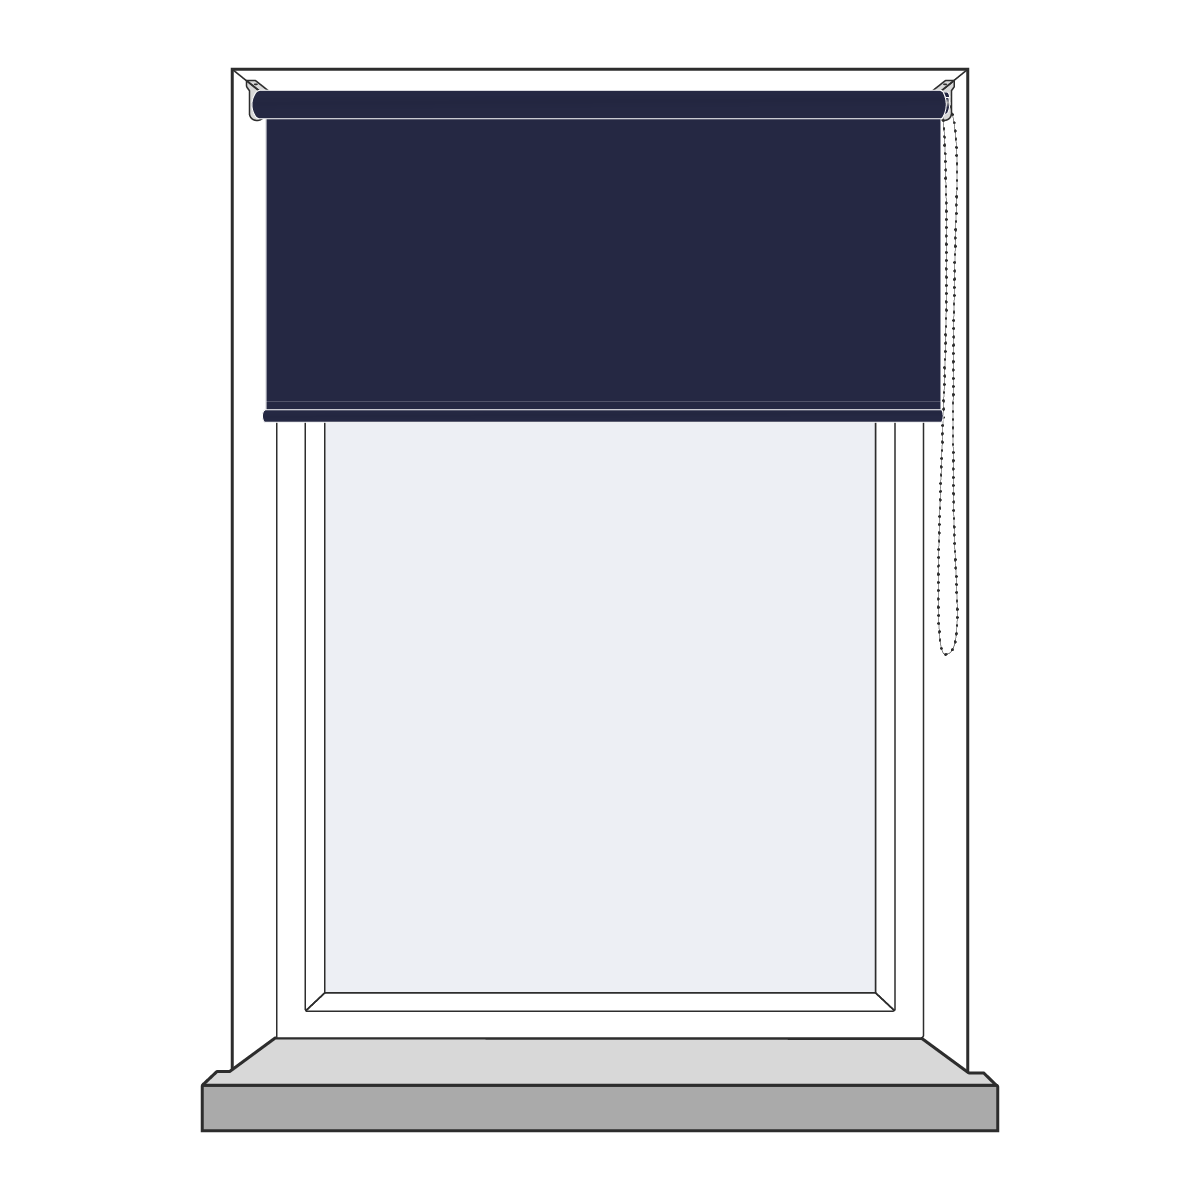
Operation
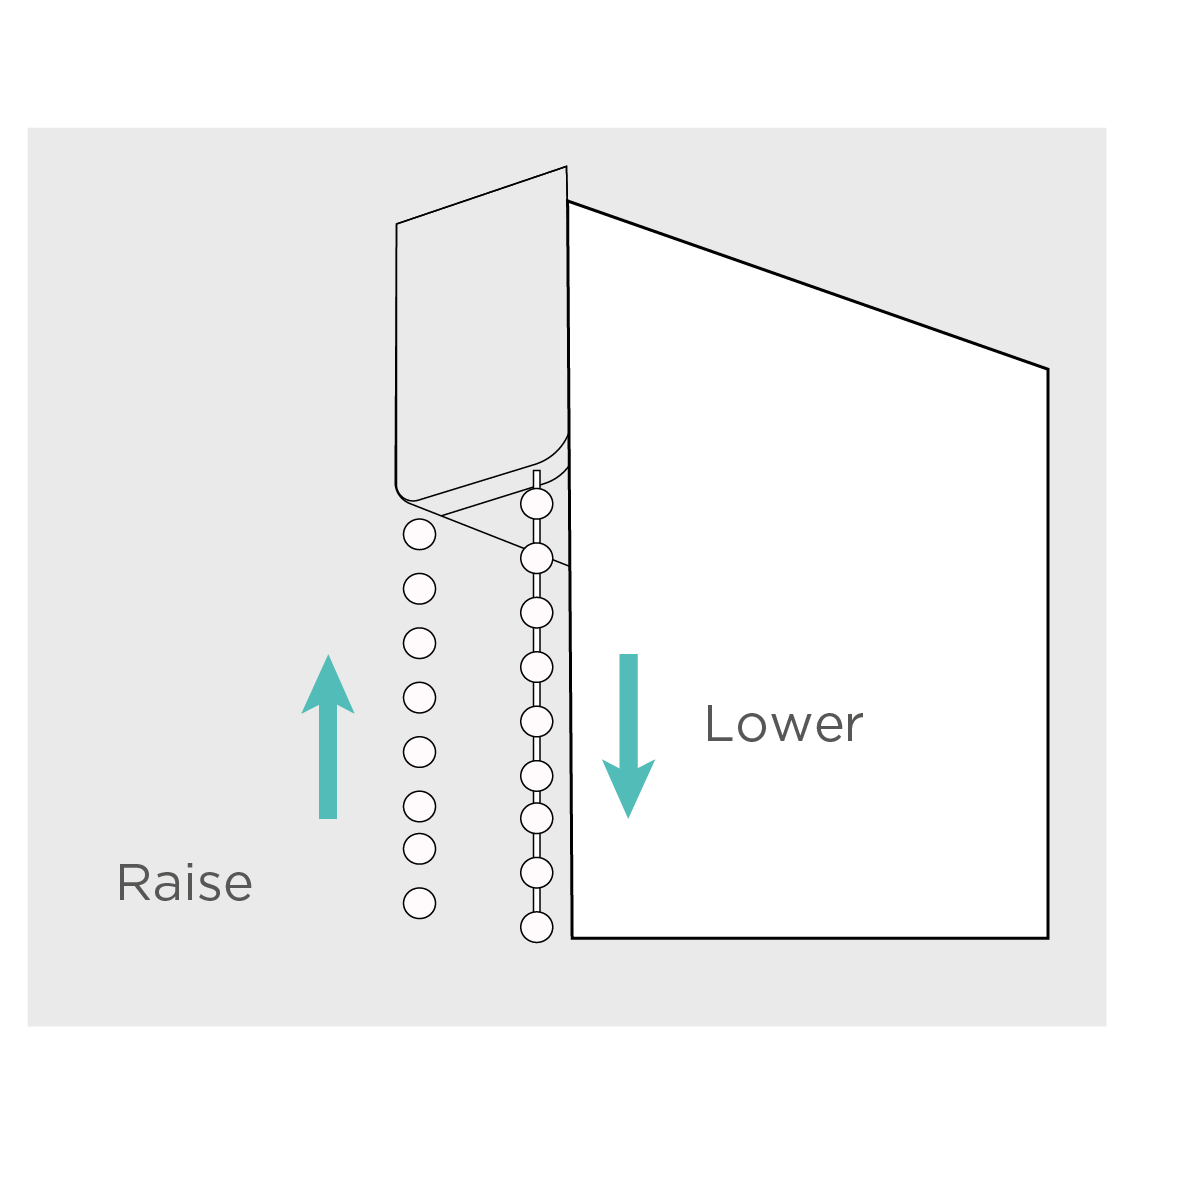
To lower blind: Move the cord to the center of the pleated curtain and slowly pull down until the string catch releases.
To raise blind: Pull the cord until the pleated curtain has reached the desired height.
To lock cords: Pull the cord to the outside of the pleated curtain (upwards), the curtain should now close automatically.
Important Note
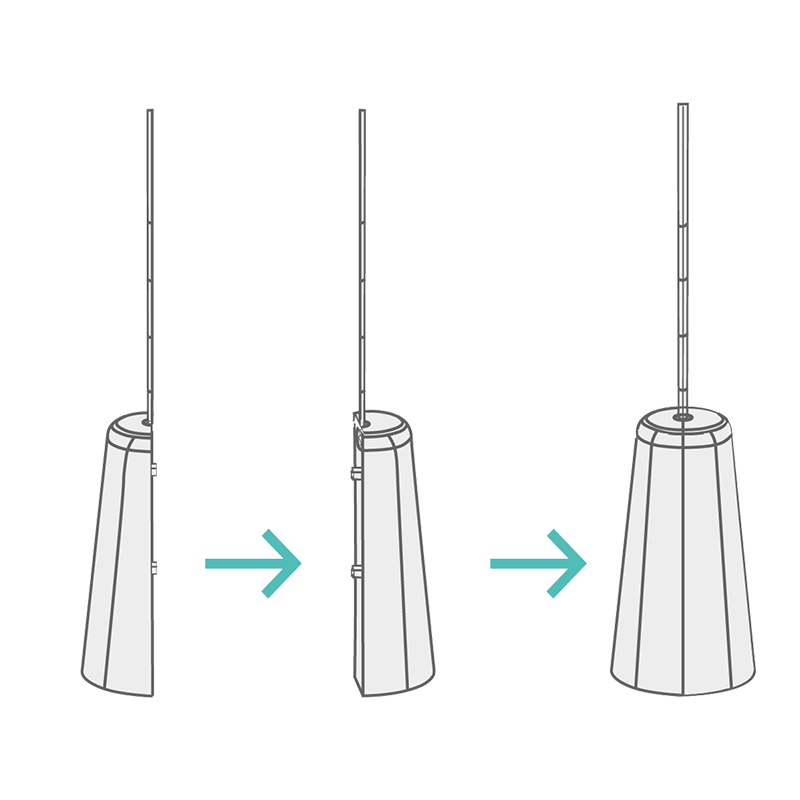
Breakaway Safety Tassel
Breakaway safety tassel is pre-fitted to the lift cords so that when a horizontal force is applied to the cords entering the tassel it safely breaks away eliminating any hazardous loops.
If the breakaway safety tassel is pulled apart untangle and untwist cords. For 2 cords: Press the breakaway safety tassel together until it is fully closed. For 3 cords: Place the loose cord in the opening in one half of the breakaway safety tassel and press the breakaway safety tassel together until it is fully closed.
If there are any doubts that the breakaway safety tassel has not been re-attached correctly it can tested by placing your arm between the cords and pressing downwards. The breakaway safety tassel should break apart with minimal force.
Fitting Instructions - Tensioned
Ensure that brackets are positioned a suitable distance away from any window, door handles or any other obstructions to allow the blind to operate smoothly.
Step 1
Recess Fitting
Outside Recess
If you are mounting the pleated blind outside the window recess, ensure that dimension C is the same on both sides. Follow the instructions for wall mounting. To calculate C, use the formula: (A-B)/2.
Inside Recess
For ceiling mounting, attach the blind to the lining. For wall mounting, attach it to the window frame.
Roof Assembly
Measure and mark the distance between the wall and the back of the bracket, taking into account obstacles such as protruding handles. The mounting brackets should be placed evenly over that pleated curtain. Hold each fastener in its intended location and mark the hole locations. Make sure the screws you use are suitable for the wall/surface you are mounting on.
Step 2
Wall Mount
Young children can be strangled by loops in pull cords, chains, tapes and inner cords that operate the product.
To avoid strangulation and entanglement, keep cords out of the reach of young children. Cords may become wrapped around a child’s neck.
Move beds, cots and furniture away from window covering cords. Do not tie cords together. Make sure cords do not twist and create a loop.
Step 3
Inserting the Headrail
Insert the head rail into the brackets as shown, then push it up until it clicks into place completely.
Step 4
 }})
Brackets
Pull down the pleated blind and use a pencil to mark where the window brackets should be positioned at the bottom. After marking, use suitable screws to attach the brackets to each corner.
Attaching the Safety Cleat
There is a safety cassette on the ropes so that it breaks when a strong horizontal pull occurs on the ropes to reduce the risk of getting stuck. Use suitable screws to attach the safety cleat securely to the wall.
Step 5
Operation
To lower blind: Pull the flap down until the pleated curtain has reached a desired height.
To raise blind: Pull the flap up until the pleated curtain has reached the desired height.
What You'll Need
To install your new blinds you will need the below tools.
Note: You will need to provide your own screws, as the required type depends on the surface you're fixing to. Please use 4mm diameter screws that are appropriate for the material you’re installing into.
Deciding where to mount the brackets
Ensure that brackets are positioned a suitable distance away from any window, door handles or any other obstructions to allow the blind to operate smoothly.
Fitting Instructions
Step 1
Bracket Positioning
If you're fitting the blind inside the recess you can top fix the brackets to the lintel or face fix the brackets to the window frame.
If you're fitting the blind outside the window recess ensure that measurement (C) in the diagram above is the same to ensure even window coverage
Step 2
Option 1: Top Fixing
If you're fixing the bracket to the underside of the window recess (B), measure and mark the distance (D), allowing for obstructions like handles that protrude into the recess area. Hold each bracket in place and mark the hole positions. Drill a suitable hole and fit each bracket using suitable screws. Please ensure fixings are suitable for the wall/ surface to which you are mounting the brackets.

Option 2: Face Fixing
If your fixing the bracket to the face of the wall, or the window frame, hold each bracket in place and mark the hole positions with a pencil. Drill a suitable hole and fit each bracket using suitable screws. Please ensure fixings are suitable for the wall/ surface to which you are mounting the brackets.
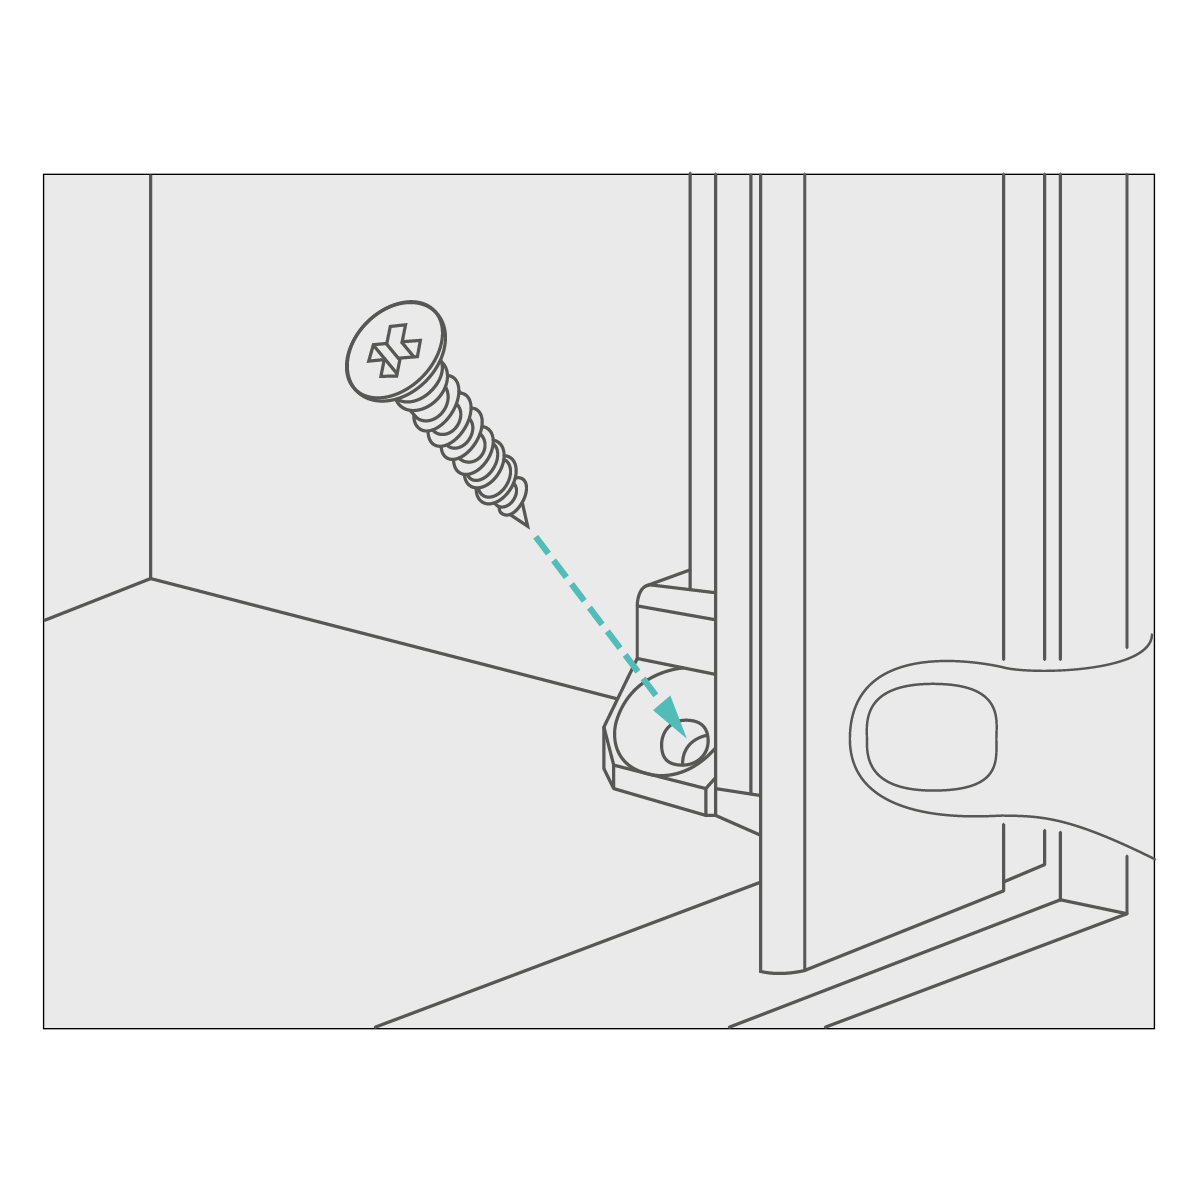
Step 3
Inserting the Roller
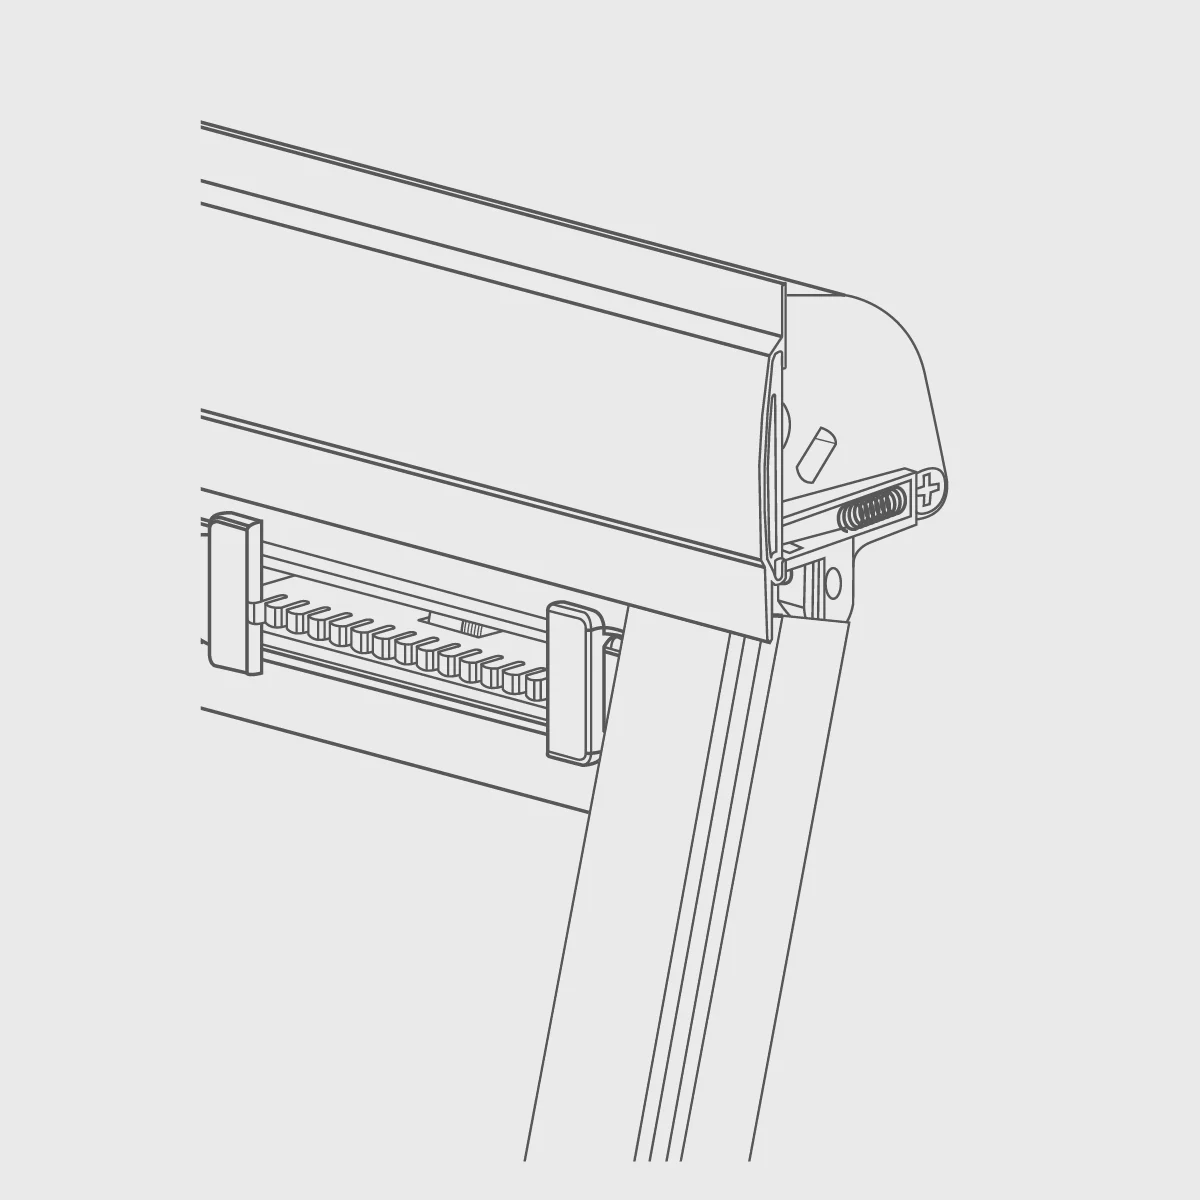
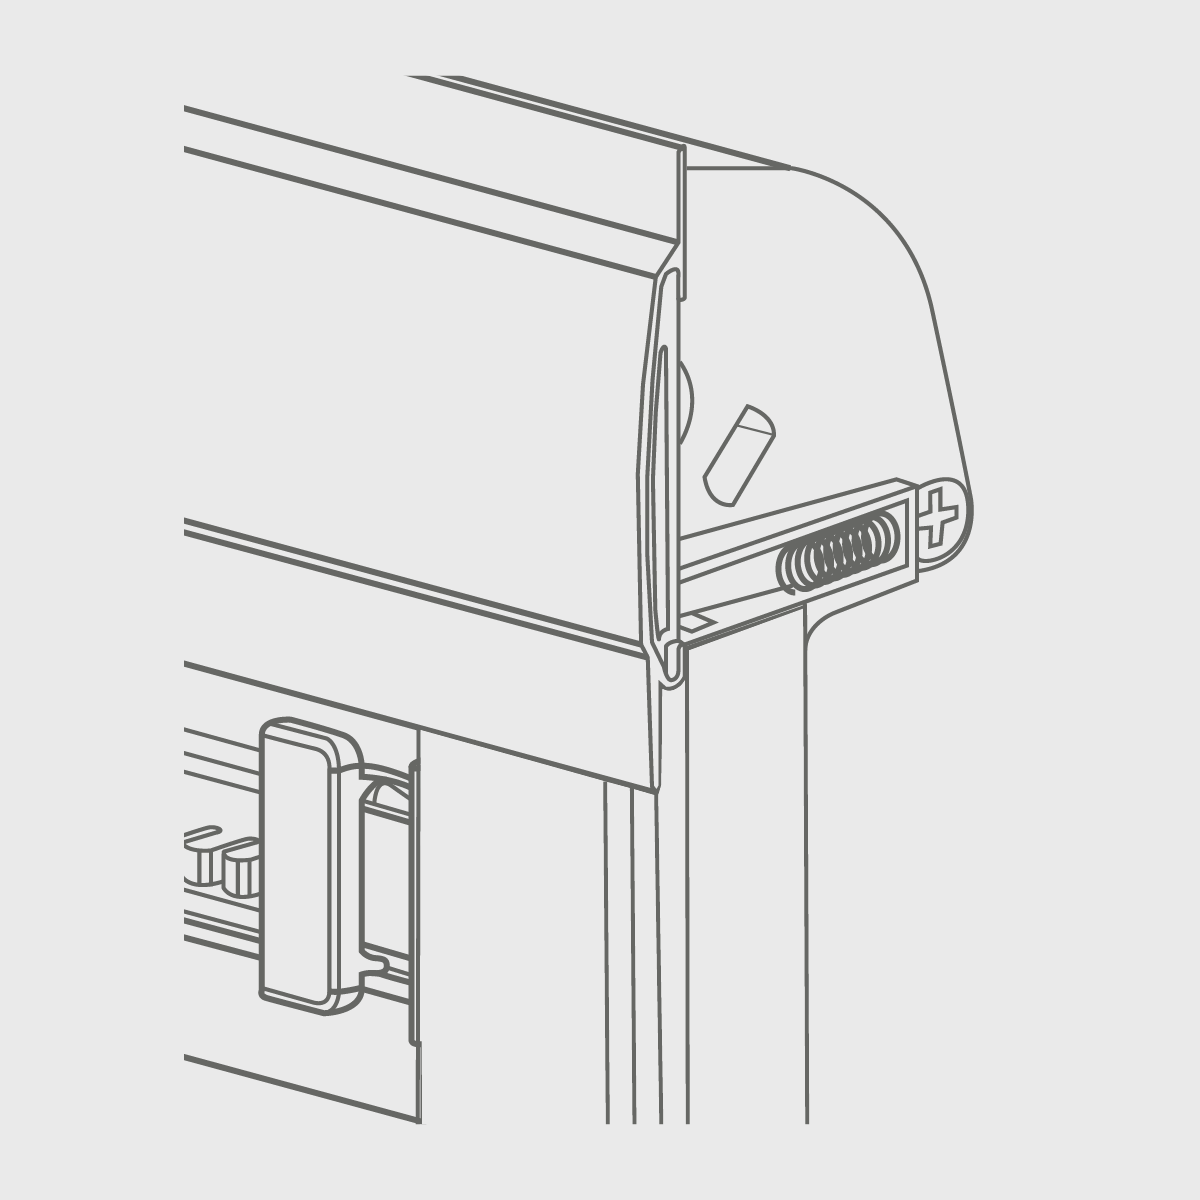
Next, holding the fully-wound blind, insert the idle pin end into the bracket as shown
With the Idle pin end now in place. Insert the control end into the opposite bracket by depressing the pin end. Then, pull down vertically until the control end clicks into position.
Step 4
Child Safety
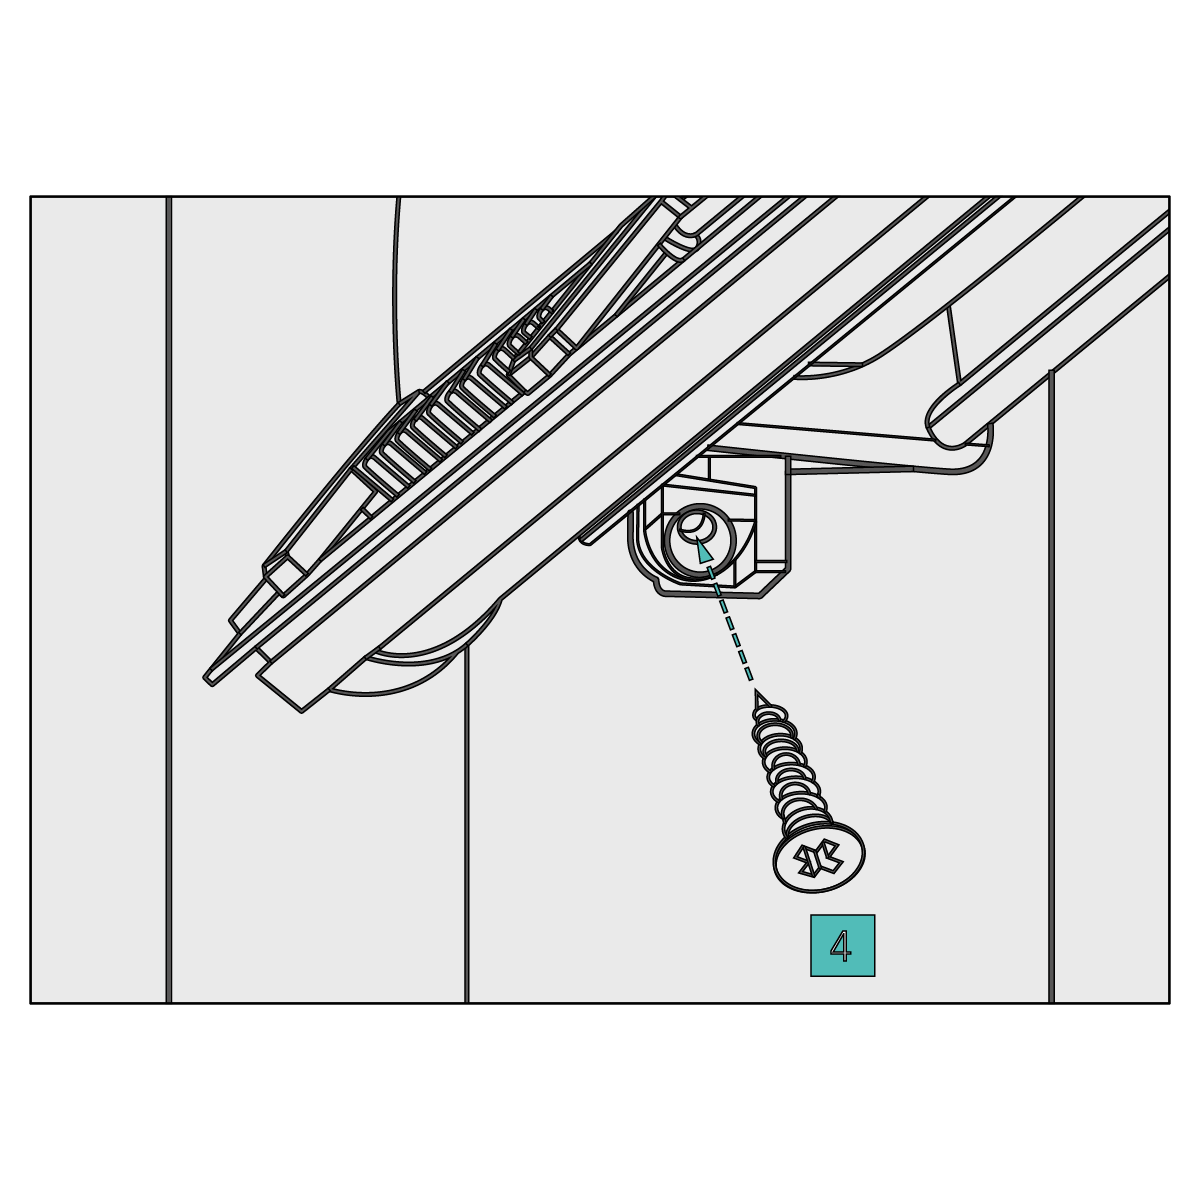
The safety device must be installed at the maximum distance possible from the control mechanism to prevent looped chain becoming slack. The chain should be taut. Place the safety device on the wall and mark the positioning of the 2 screw holes, then drill two suitable holes.
Securing the Safety Device
The safety device must be installed at the maximum distance possible from the control mechanism to prevent looped chain becoming slack.
Place the safety device on the wall and mark the positioning of the 2 screw holes.
Drill holes using a suitable drill bit. Place device into position ensuring the chain is fully taut.
Maintenance
Visual Checks
Your new blinds is maintenance free, however we recommend that regular visual checks are completed to ensure that no components have been damaged, which could result in operating difficulties and/or cause a safety risk.
Warning

Child Safety
Young children can be strangled by loops in pull cords, chains, tapes and inner cords that operate the product. To avoid strangulation and entanglement, keep cords out of the reach of young children. Cords may become wrapped around a child’s neck. Move beds, cots and furniture away from window covering cords. Do not tie cords together. Make sure cords do not twist and create a loop.
What You'll Need
To install your new blinds you will need the below tools.
Note: You will need to provide your own screws, as the required type depends on the surface you're fixing to. Use 4mm diameter screws that are appropriate for the material you’re installing into.
Fitting Instructions
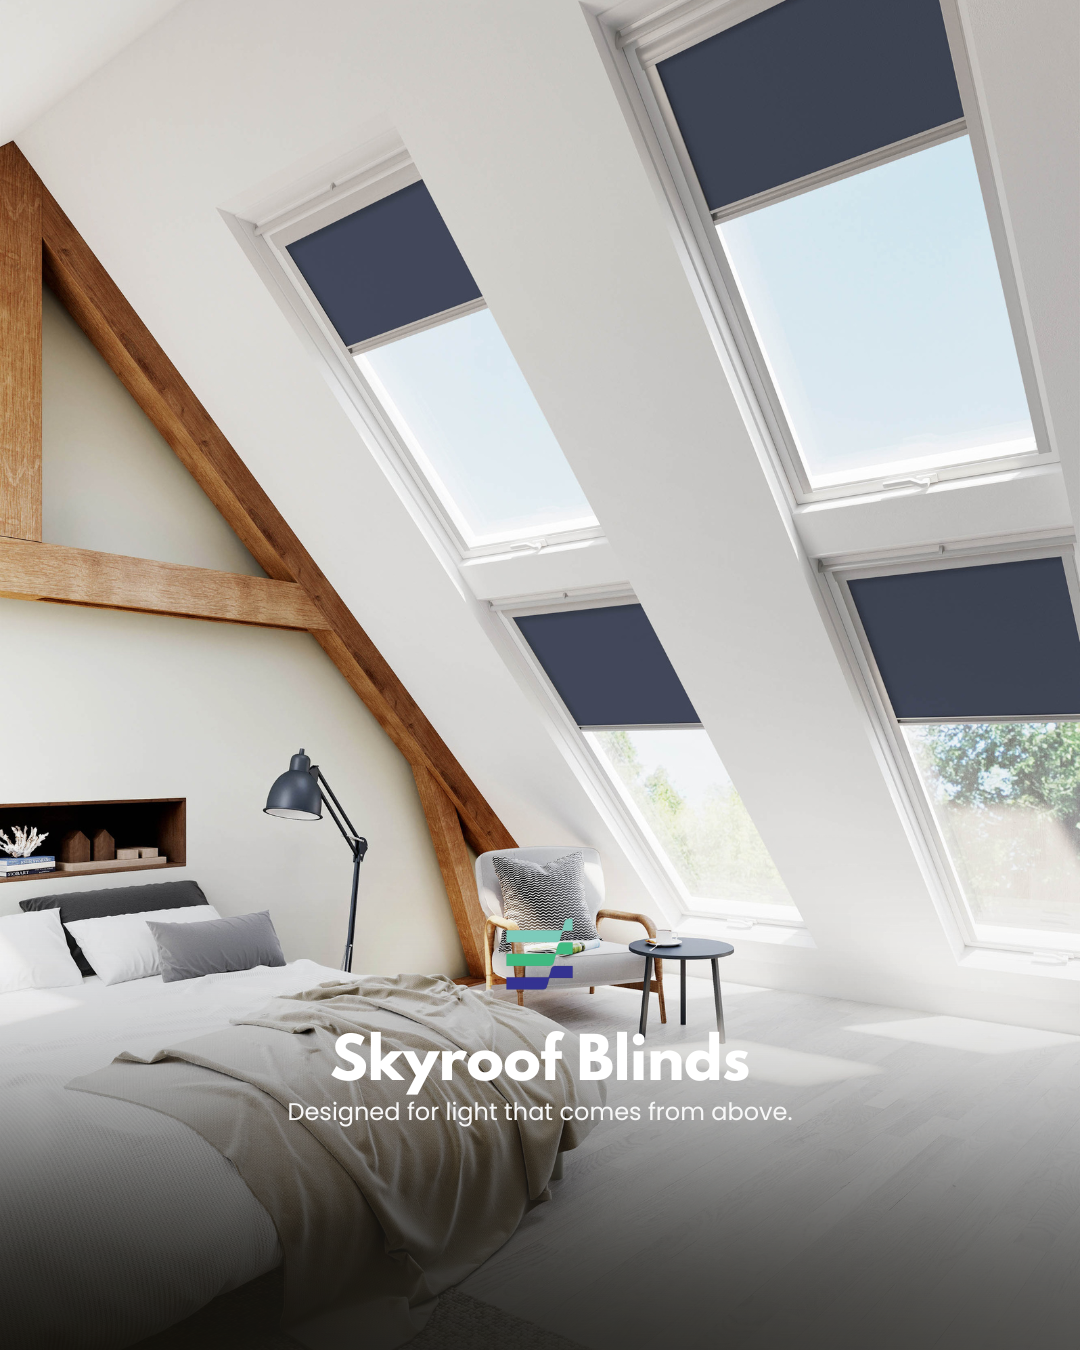
Once you have your tools to hand, follow our step by step guide to install your skylight roof blinds.
Step 1
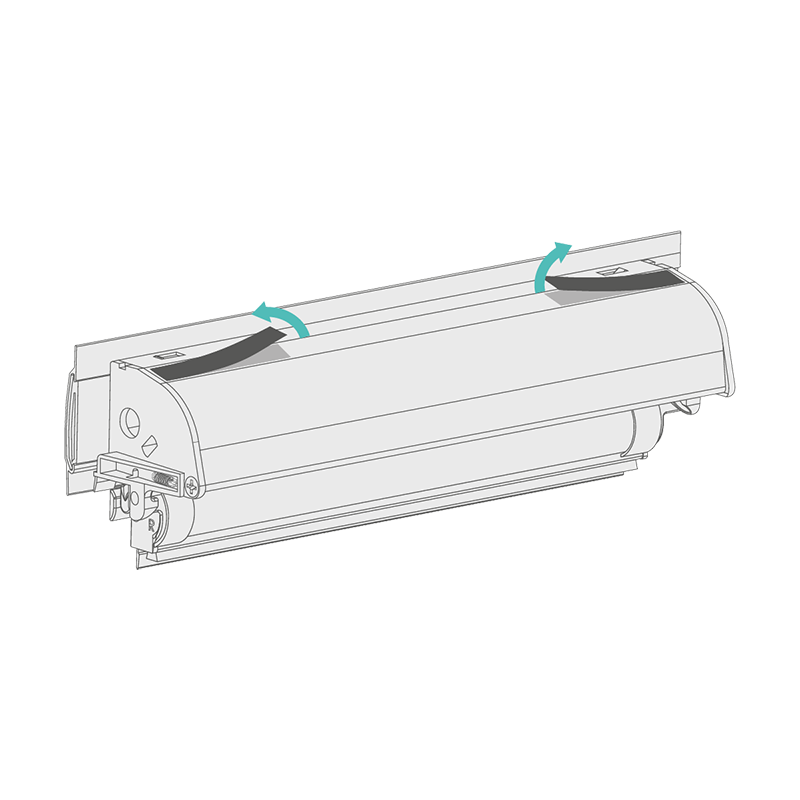
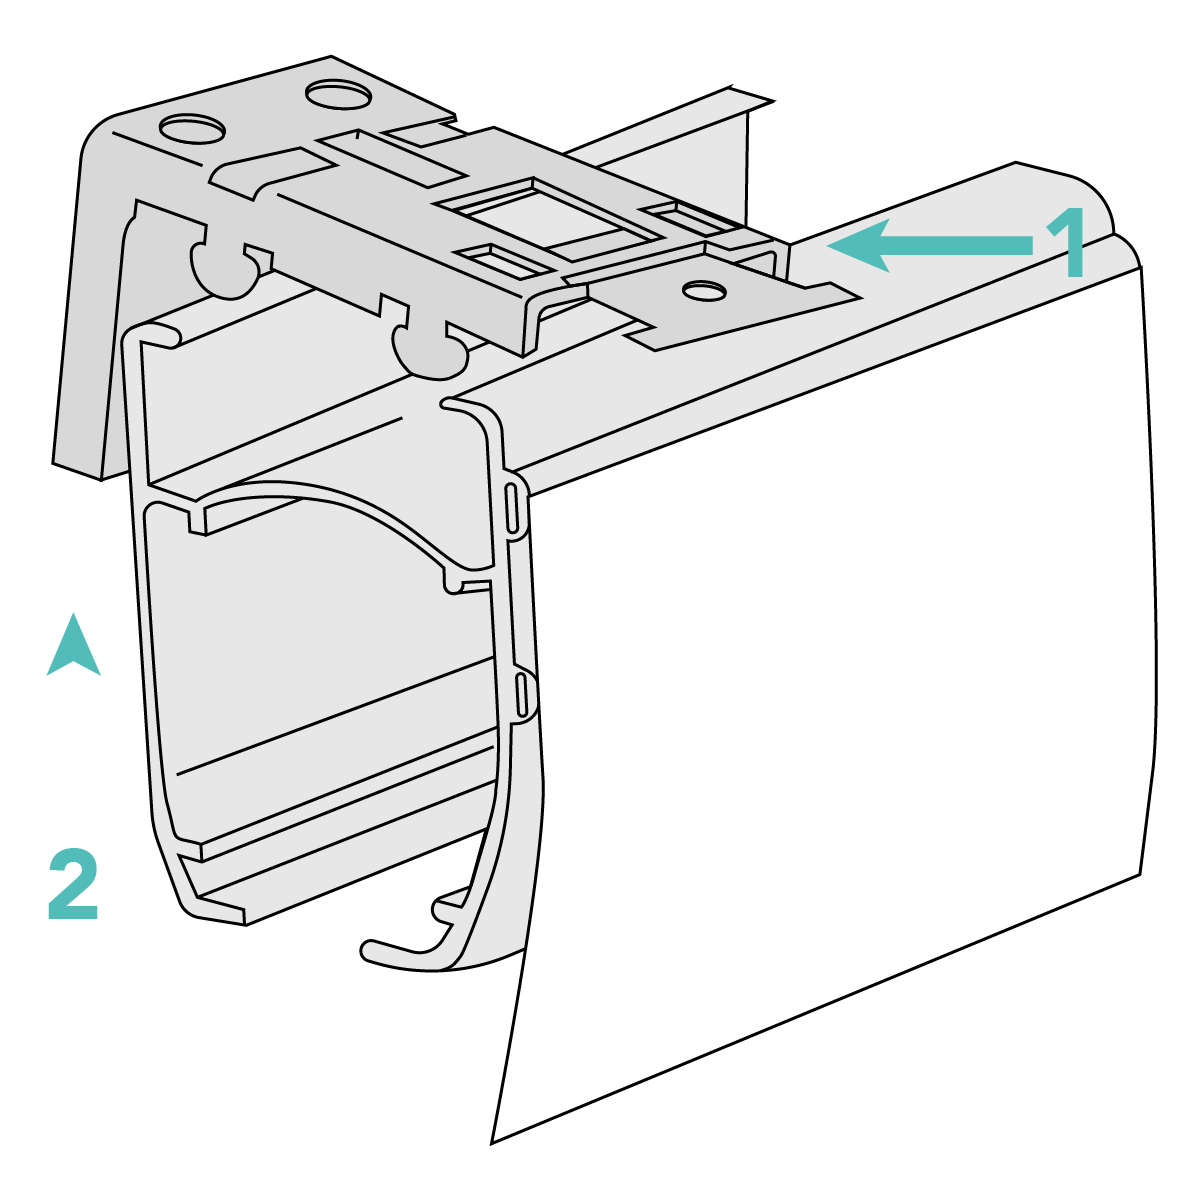
Preparing the Headbox
Peel the backing from the red double sided tape on the headbox.
Step 2
Attaching the Headbox
Secure headbox to top of window using double sided tape
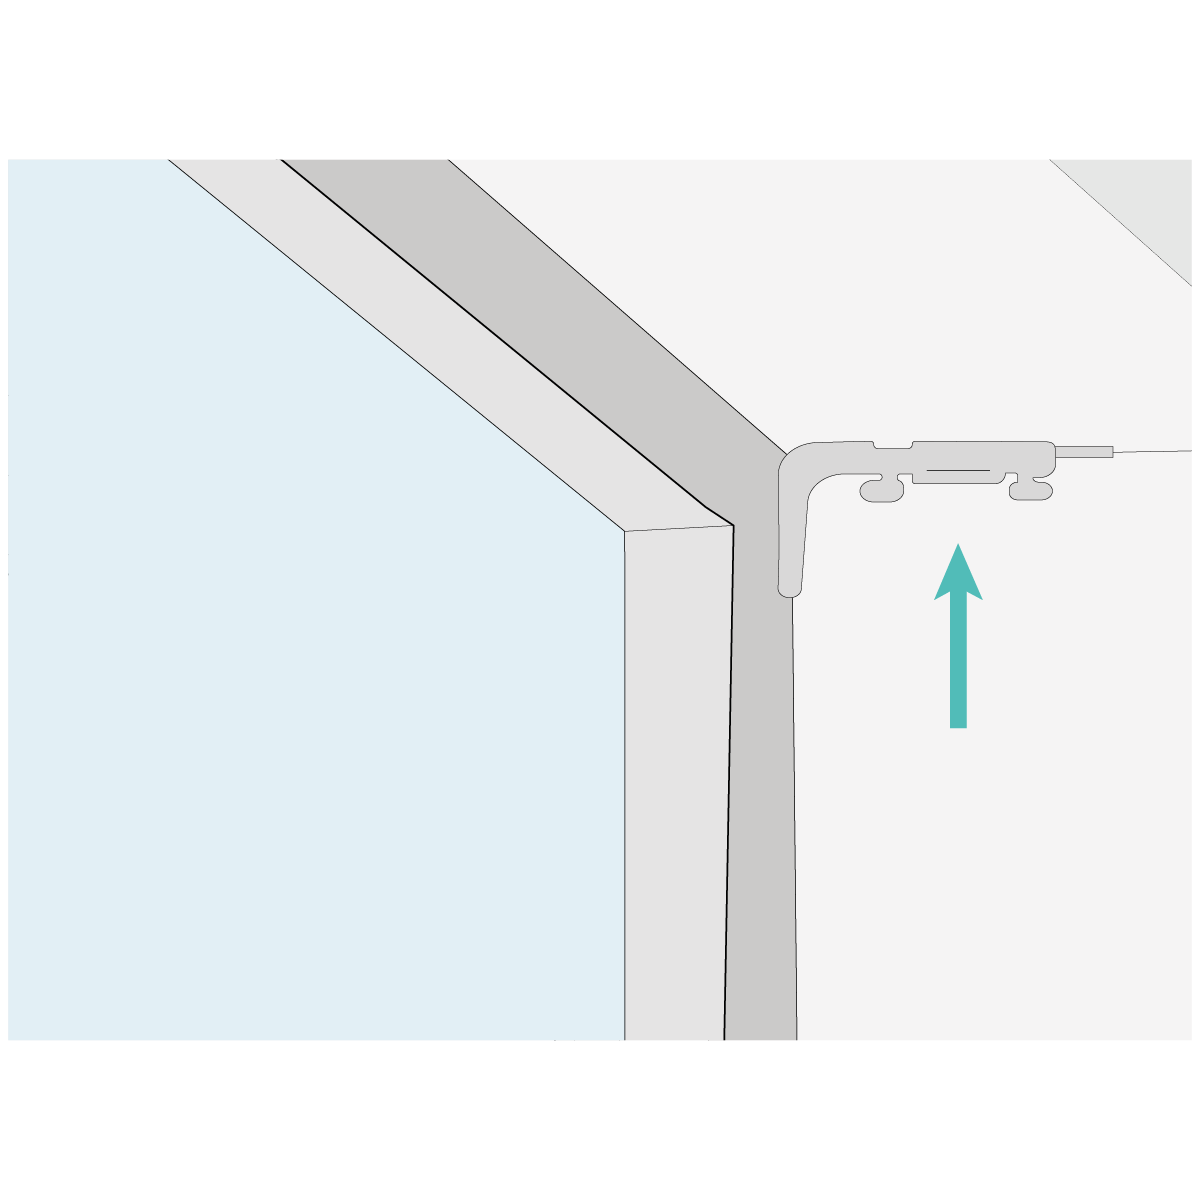
Step 3
Securing the Headbox
Secure headbox to window frame at each side using countersunk screws
Step 4
Inserting the Side Channel
Slide the right side channel at a 30o angle onto the bottom bar end cap to ensure position under the headbox lip.
Push the lower end of the side channel into position against the edge of the window.
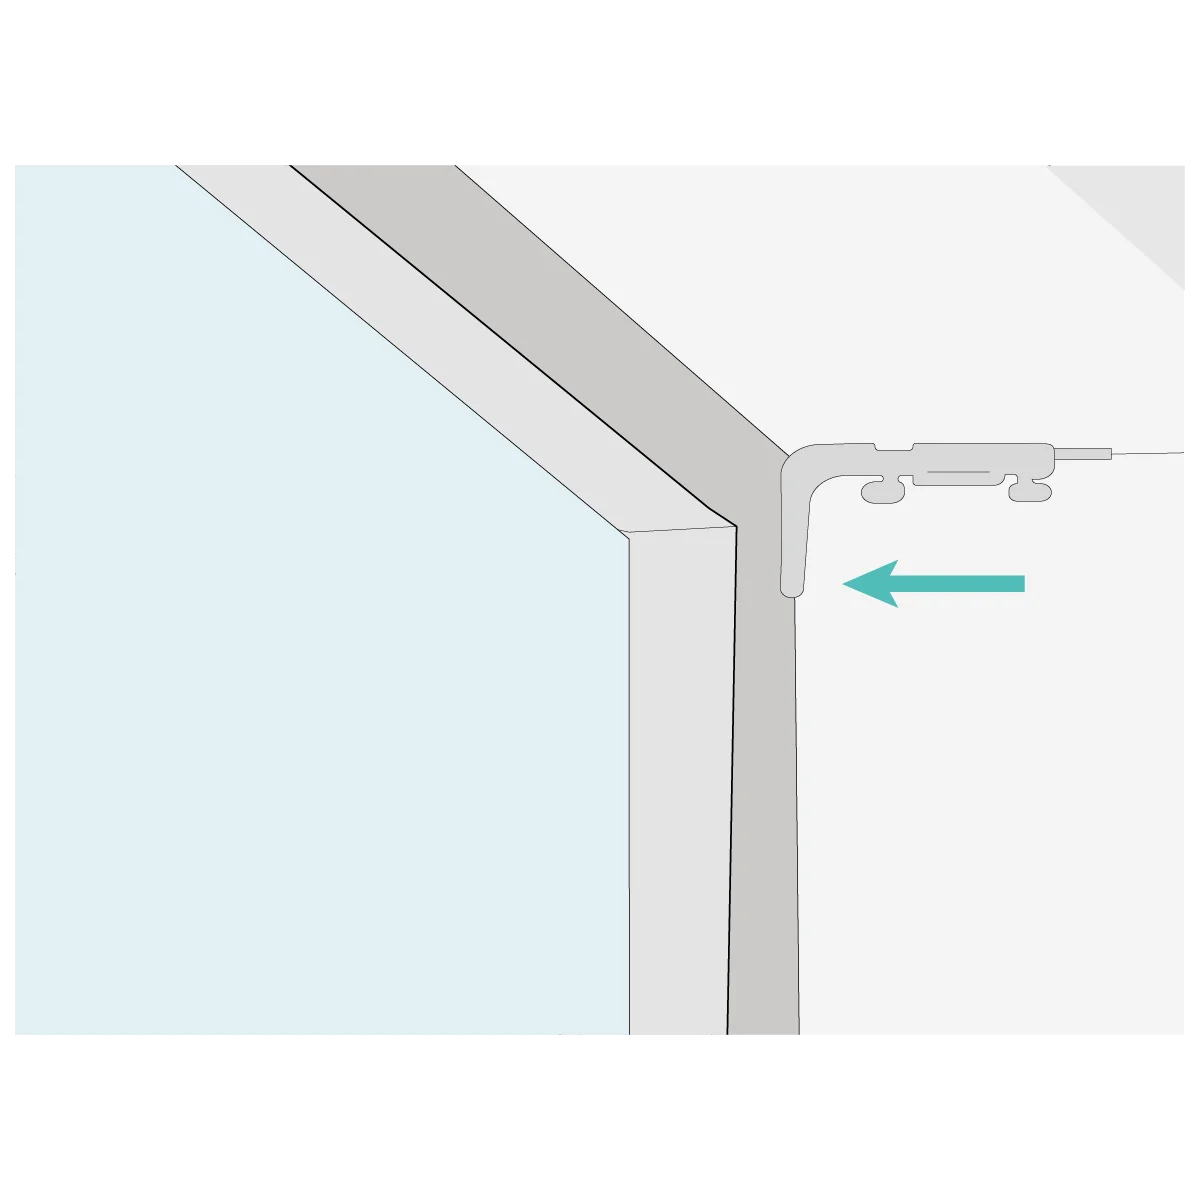
Step 5
Securing the Side Channel
Secure the side channel into position using the countersunk screws provided.
Repeat steps 4 & 5 for the left side channel.
Step 6
Remove the Cord Containers
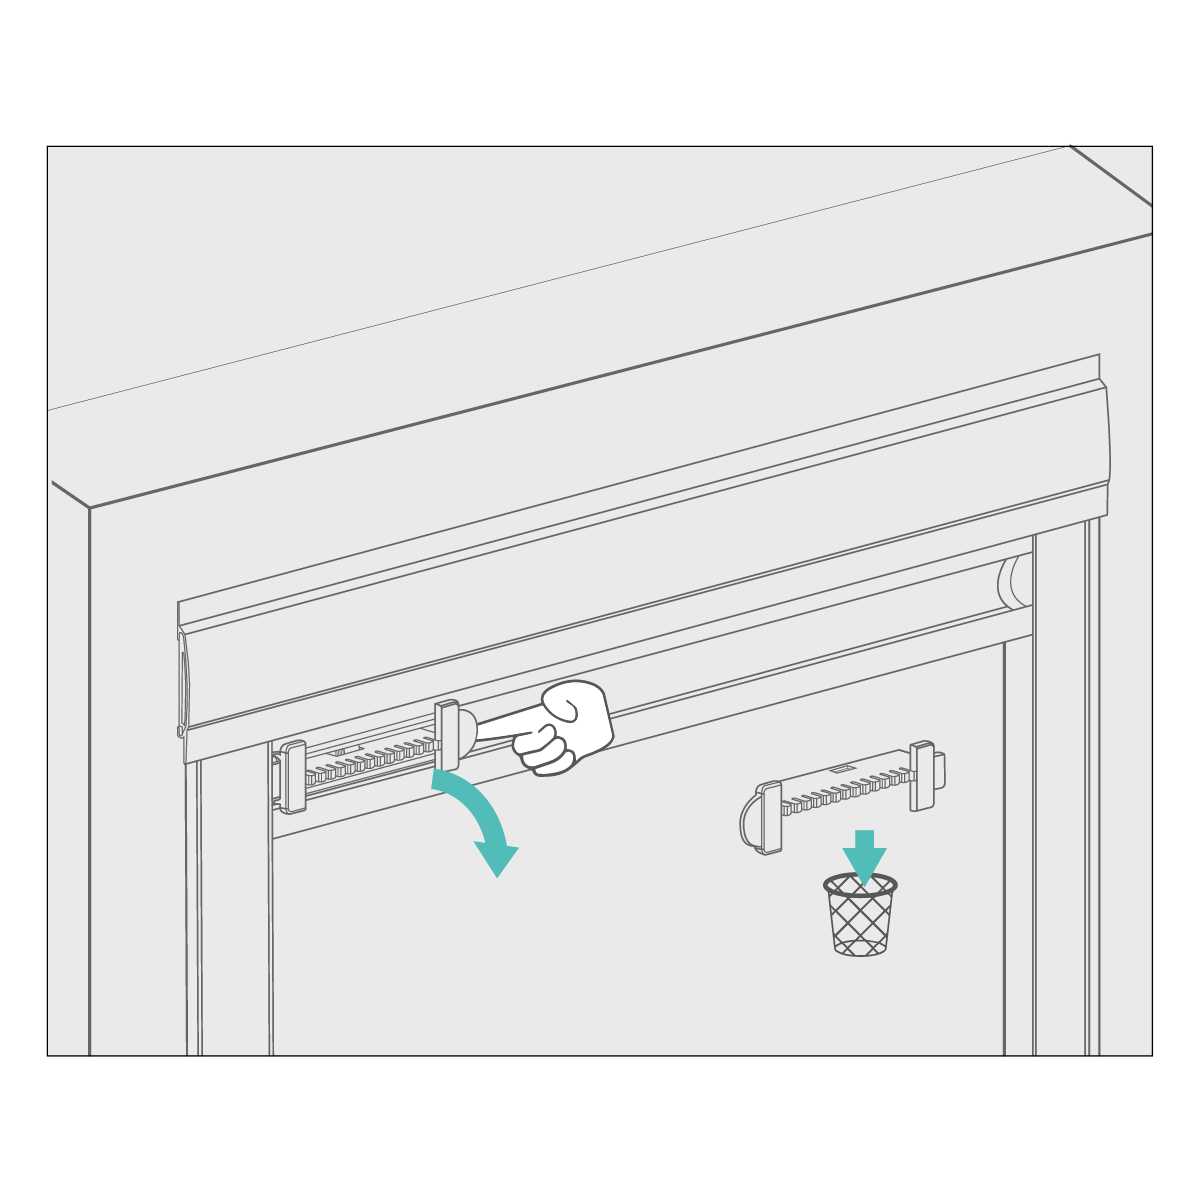
Remove the red cord containers, unwind the cord and dispose of the cord retainers.
Step 7
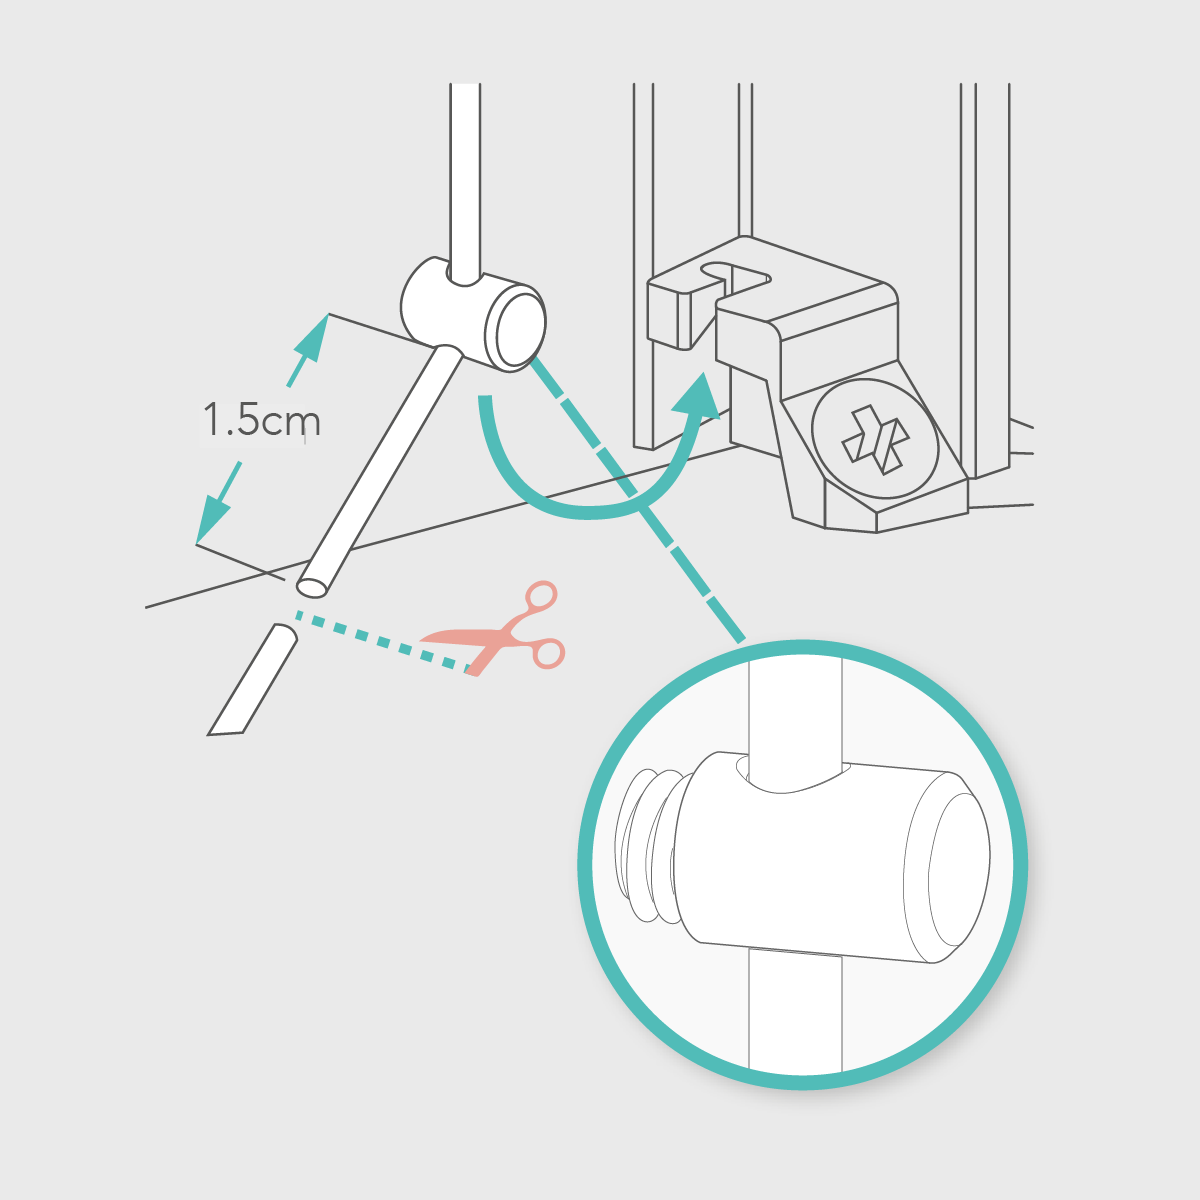
Visual Checks
Pull cord to bottom of side channel and secure cord stop in the locking mechanism & trim excess cord to 1.5cm once it is confirmed the blind is working correctly.
Additional Information
Adjusting the Tension
The blind is supplied pre-tensioned however, should this need adjusted, please change as follows:
- Use the 2mm allen key supplied to adjust the cord stops.
- If the blind does not stay in position or raise on its own accord, add tension to the cords by adjusting the cord stop.
- If the blind is difficult to open or close, adjust the position of the cord stop by reducing the tension ensuring the bottom bar is level.
- If the bottom bar is not level adjust the cord stop tension. To do this, remove it from locking mechanism and adjust accordingly